


Agentic coding is coming to FileMaker natively
What is happening today is fascinating. AI is causing a landslide for the way people develop software. AI-driven models elevate almost any process. Agentic development is coming to FileMaker natively.
Most astonishingly, Artificial Intelligence (AI) already is available and an increasing number of FileMaker developers use AI one way or another. Tools appear to make the process simpler. Claris announced agentic development will be brought into FileMaker directly. Check the following page on claris.com. On the same page you can subscribe to a newsletter to be specifically informed about upcoming AI-integrations.
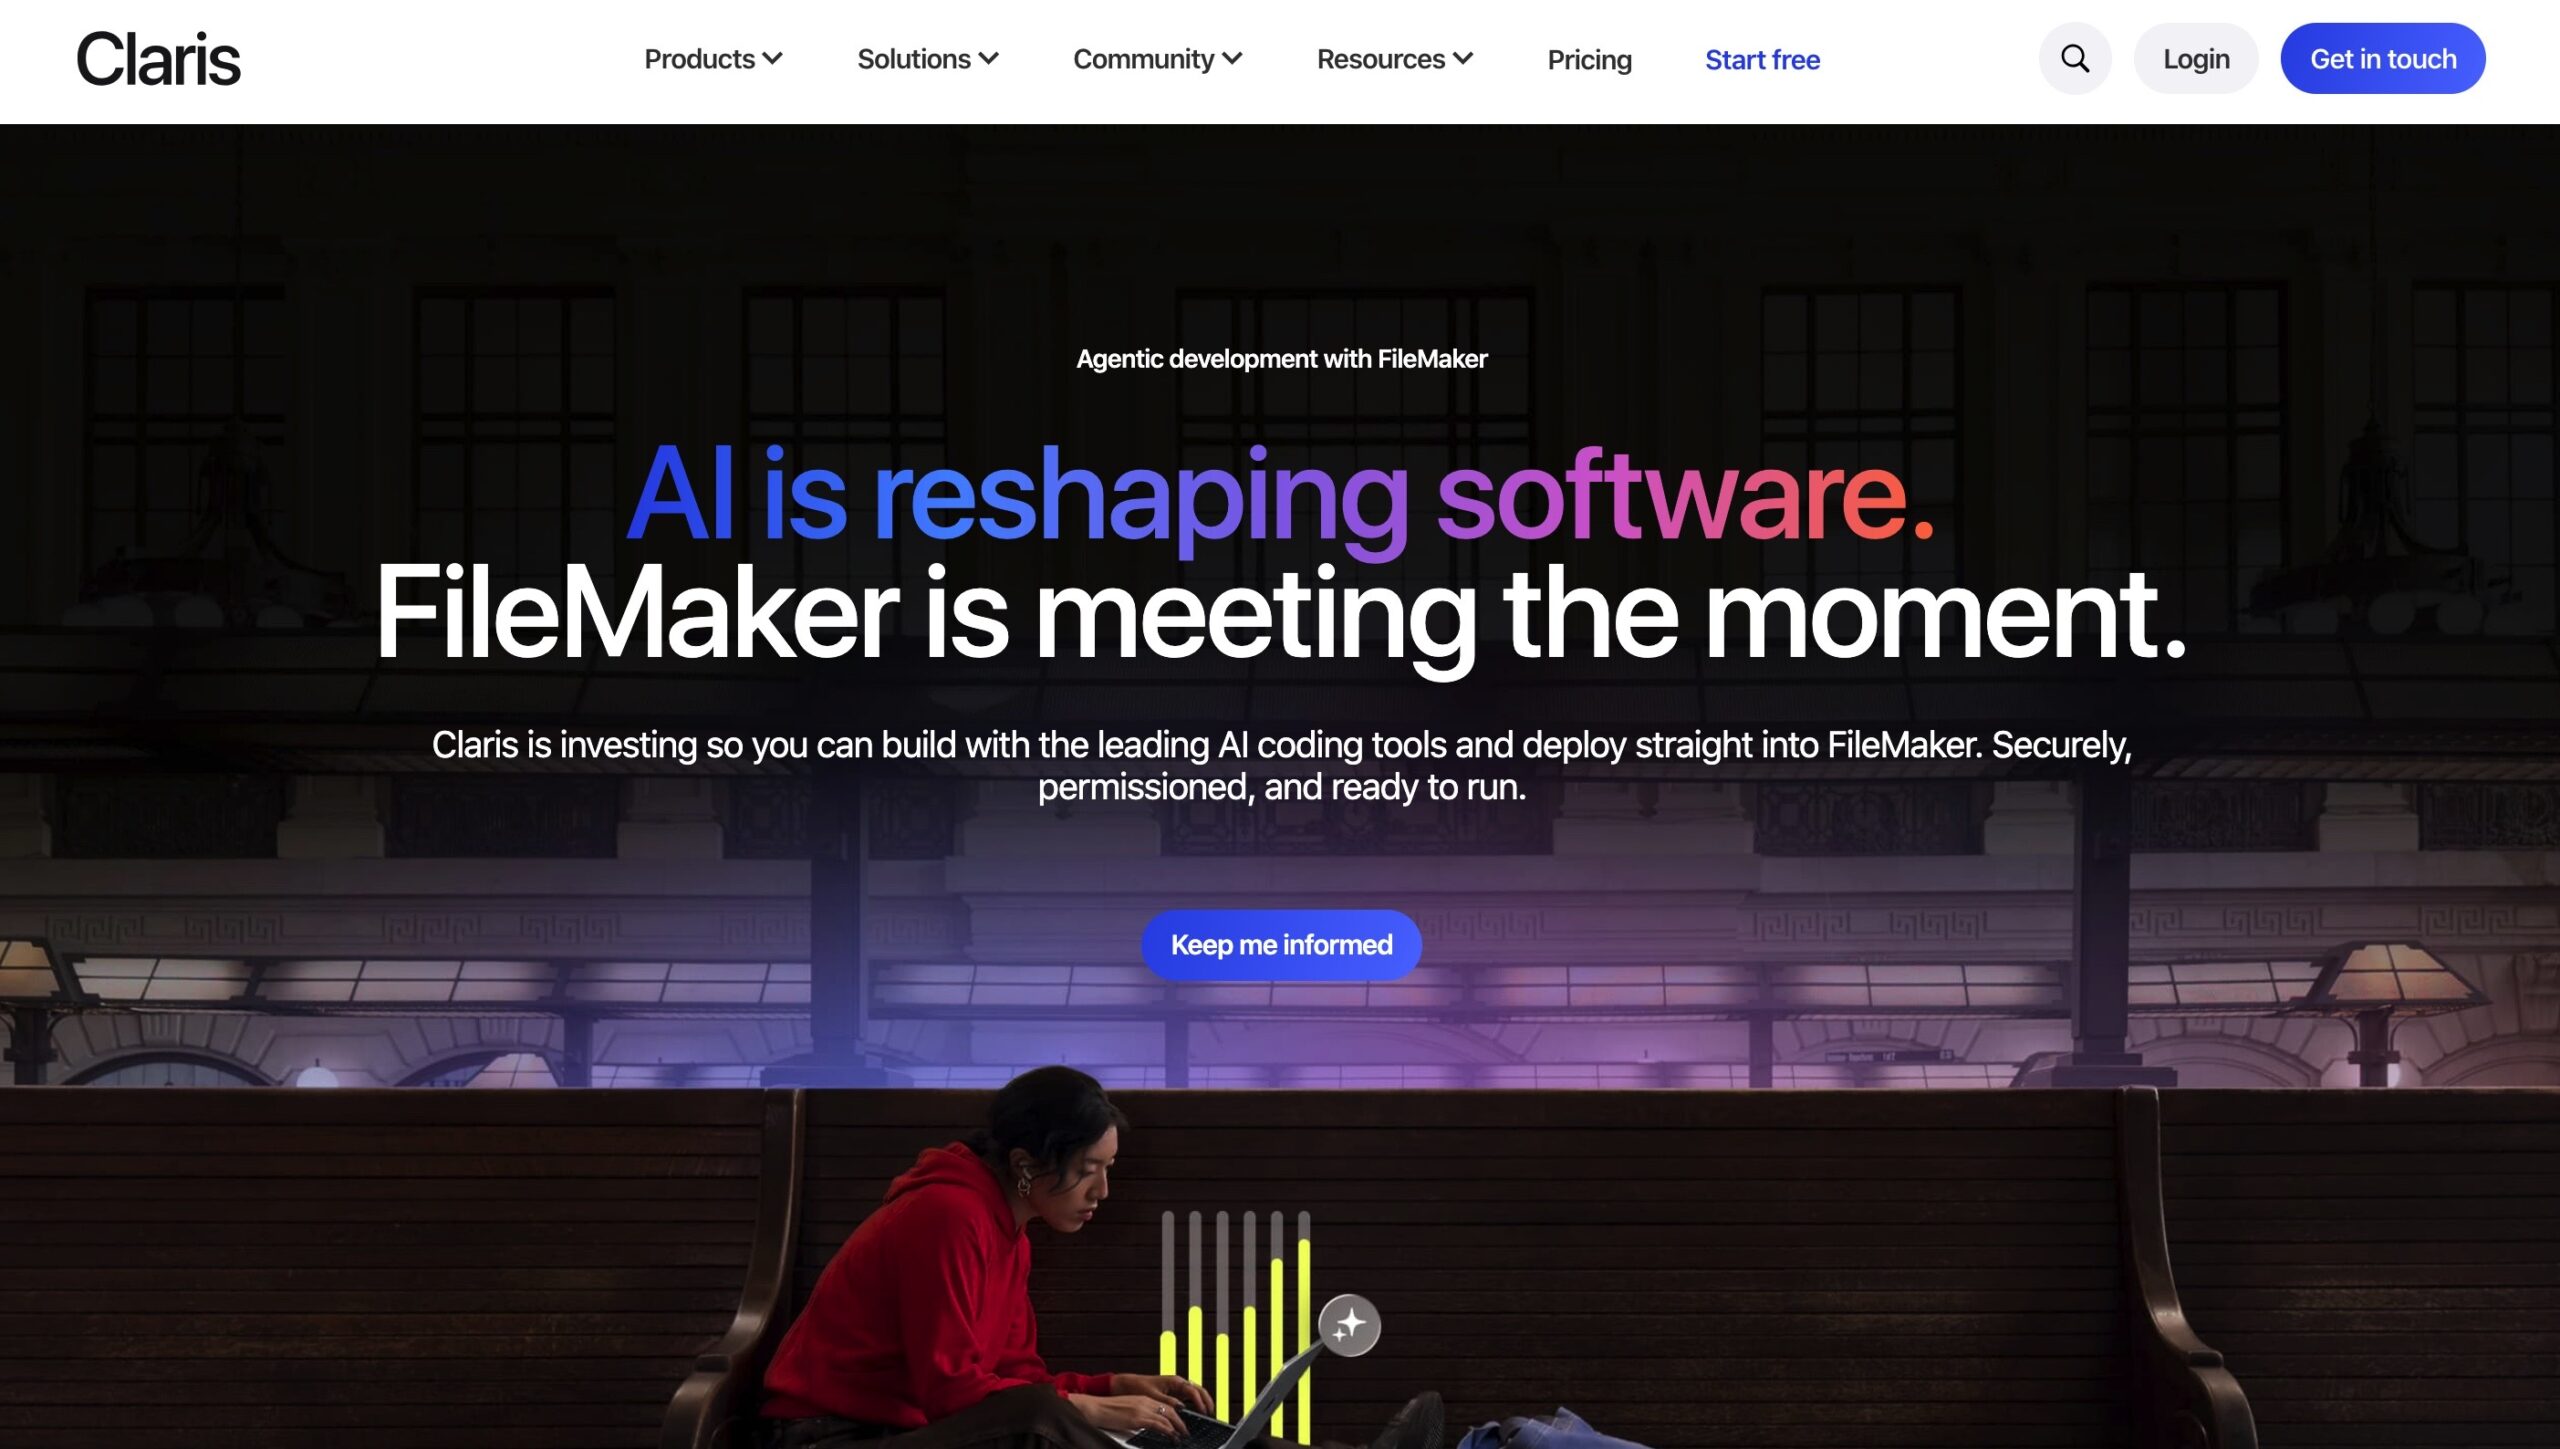
On the horizon
What Claris has already been showing and telling in their community talks:
- Integration of main AI systems (Claude, Codex and others).
- Every aspect of FileMaker will be accessible by AI: tables, fields, schemes, scripts, layouts and anything else.
- Think of these tasks: developing, bug-fixing, creating dashboards, reports, layouts or even creating solutions from scratch.
- All directly from within FileMaker. By the end of 2026 it is expected to roll out.
- This is not about a specific feature but rather about a direction of thought and FileMaker integration.
Why is this fascinating? It will profoundly change the way developers work. While some developers embrace new technologies, others are slower to adapt or refrain from using it. Whoever you are and whereever you stand, things will change. Those embracing AI with the help of new tools already will get native tools. Those refraining from using any of it will get native support to make it simpler to use.
A changing job profile
In a not too distant future, basics will probably be cared for by AI. Complex scripts can be handled with ease. Your task as a developer will start to be different. Everyone needs to find a different approach.
- What AI most likely will do better or quicker than you: Find the details, the bugs, alternative ways, write a script.
- What AI cannot do is to understand the goal of your project. It needs guidance. You are the guide.
You understand the business and the project. AI is a tool to achieve the goals. The tool you get is so powerful that some tasks no longer need to be in your focus. You can shift the focus of AI to these tasks or ask it to support and enhance your skills in a certain direction.
Next steps
Claris encourages developers to start learning about AI and how to use it. Resources are available here:



Object Repository
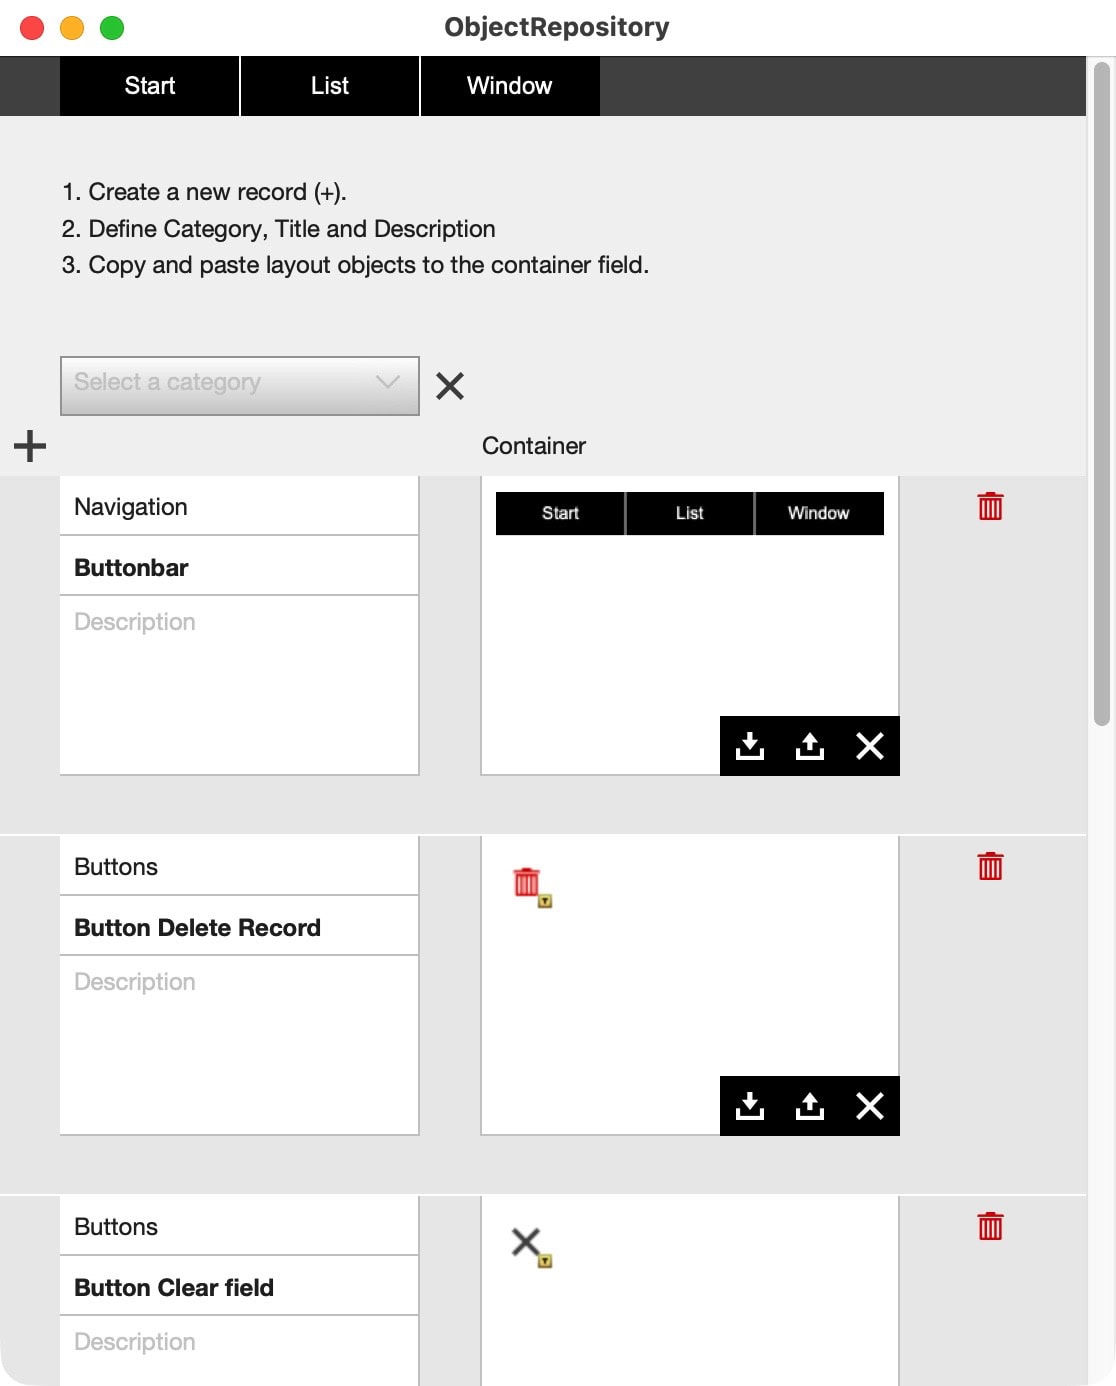
Did you know you can store FileMaker layout objects in a container field? You even get a preview of the objects or group of objects. This can be useful if you have objects you might need repeatedly throughout your collection. Think of icons, button bars, buttons, or even all objects of entire layouts.
There are several ways to simplify the working with design elements.
- Duplicate layouts
Once you have setup one or more layouts, many will duplicate existing layouts for new purposes, then adjust the fields, settings, etc. - Hidden page
One way to permanently store useful layout elements is to put them on a hidden page, only visible to a developer. - Different file
You might prefer a file for specifically the purpose of reusing elements. - Copy and paste
Once you have an element somewhere in your solution, you always can go back to that layout and by copying and pasting it to another layout you reuse what you achieved before.
These are all valid methods to reuse carefully designed layout objects. But there is another method:
- Object Repository
Using a dedicated table to store layout elements can be of big help to permanently store any object, along with its settings.

ObjectRepository addon
The ObjectRepository addon adds a table to your solution to store layout objects. This is not just about storing the object itself, but also about assigning additional information, like a category, title, and description. This additional information helps to understand the usage and definition. It also helps to select categories or potentially search, find, collect, or process the information.
The table also has a container field, to and from which elements can be pasted and copied. The container is set to “Images” or static content. You now get a preview of the objects stored in that container.
Why use a repository?
There is no “right way” of doing things. Using a repository for design elements is not always needed. However, the more complex your solution becomes, the more design decisions you must make. Keeping track of all the small differences might become a challenge. If you store elements in a dedicated location with some additional information, this is simpler to handle.
And how about the following: You created a complex printing page or dashboard but want to test some new elements. Then the customer wants to see or try another angle of representation. You can rework the original layout or duplicate the previous version for future reference. With a repository, you also can simply copy all objects from any layout and paste them into a container field of the repository. There is no need to group anything. Just copy from your page to the repository and give it some extra information.
Let’s say you want to improve on a complex layout but would like to preserve the current settings. Copy all elements and paste them to a new entry in the ObjectRepository addon. You can name it and write a date or version number and can return to that version of elements any time.
Positioning elements made simple
To simplify positioning elements, there are two helpful thoughts:
- Use the grid in FileMaker. Let objects snap to the grid.
- Add, if necessary, an extra object in the upper left corner of the layout before copying.
All layout elements are located with x and y values from the top left corner of any layout. If you add an extra element to that corner, you can then easily copy all elements and paste them into the repository. When copying from the repository, move all elements to the top left corner to position everything correctly. After positioning, simply remove the added element.
Working on several projects?
If you work on multiple projects, it might be an idea to create a central repository just for the purpose of sharing. You can either add the addon to any project, or create a new file for the purpose of organizing design elements. What you prefer is up to you.
Please enhance the basics with anything you might find helpful for your situation specifically. Consider this addon to be a starting point, not an end point.
Drag and drop
The addon comes with a drag-and-drop element. It is a simple button you can place on any layout. This is certainly not the best solution, but it highlights the workings: you trigger a script, which then opens the ObjectRepository as a separate window. Why? Now you can have two windows open next to each other. You are working on the layout of one window (in layout mode) but can copy to and from the ObjectRepository window. This is practical and offers maximum flexibility.
Email does not work?
We are happy to send out free content, but sometimes require you to provide a valid and personal email address. This excludes free, gibberish, or discardable email addresses. We were forced to take action and tighten rules, as we were flooded with hundreds of fake addresses. Usually, a business address works well, as long as it is personal and not a generic address (like info@ or tech@, which are considered unsafe). We will then send you the download link or subscribe you to our newsletter, whatever you applied for. Enjoy your benefits.

The most difficult thing for developers
Developing can be quite complex. It involves systems, logic, dealing with desired and unwanted outcomes, and much more. Those challenges make it interesting. If you love challenges, you probably like being a developer.
There is a quote, which I particularly like:
“I think most programmers spend the first 5 years of their career mastering complexity and the rest of their lives learning simplicity.”
Buzz Andersen
According to this insight of a developer, most time of your career would you be spending on learning simplicity. Whether you feel that to be true or not, or applicable to your situation at all, there is a lesson to be learned.
Master the details
Consider creating a software solution to do certain things. You master the details, the complexity. Everything runs well. That is, for the moment. Now try to explain the working to another developer or pick up the software after a year. Most likely, the original and working solution does not seem to be that simple anymore. This is following the rule that writing code is easier than reading code.
Clearing the path ahead
That latest observation can serve as an anchor for future development. Once you realize that a working solution usually isn’t as simple as it probably could be, awareness starts to change. This consideration might change how you create future updates or new solutions. In this process you most likely will try to improve the work you did before. Simplifying a previous approach is one of these things.
Simplifying things is most likely a main challenge of your career. The challenge is not “complexity” if you are good at handling that. It is the simplification. Instead of simplification, think of related concepts, like simplicity for upgrades, enhancements, and reductions. You also might think of how you structure scripts, handle errors, and improve on design and accessibility for the user. All of these issues can be realized in various ways. Here is the specific question to ask yourself: How can this particular process be simplified?
Whatever it is, clearing the path ahead, to my understanding, is a process of simplification, not conquering the technical complexity only. Some benefits of simplifications are the following:
- More stable structure
- Easier to update and maintain (sustainability)
- Easier to enhance or configure
- Less support needed
- After the initial investment: cheaper to handle (result of previous points).
Develop the developer first
Simplifying is hard and requires both experience and conceptual thinking. It therefore isn’t a straightforward process. It grows over time. The developer always develops himself before he can improve on any project or approach. It is a two-step simplification, by first learning what you need, get an idea and resolution, then proving the idea in an update or new product. Over time, your solutions will become both more sophisticated and less complex at the same time. That is, where experience and real thought pay off.
What holds developers back from improving existing solutions? Frequently it is the paycheck. If a customer does not want to pay for improvements, they usually do not happen. The tricky question is here: If no customer pays you for improving, will you improve yourself nevertheless? And if so, how do you do that? Simple is beautiful. Simpler is usually more beautiful, more sustainable, and more future-proof. How to achieve that quality?

Back button
How to create a back button for FileMaker solutions? Mostly it is not an essential feature, but it can be helpful. How do you implement a simple back button? Here is an example that doesn’t need any tables, fields, or scripts. Just a simple button bar to copy and paste to your solution.
Clients navigate your solution using any menu given. Sometimes not everything is clear. Probably some layouts are not listed in the navigation. Wouldn’t it be marvelous if there were a way back to a previous location?
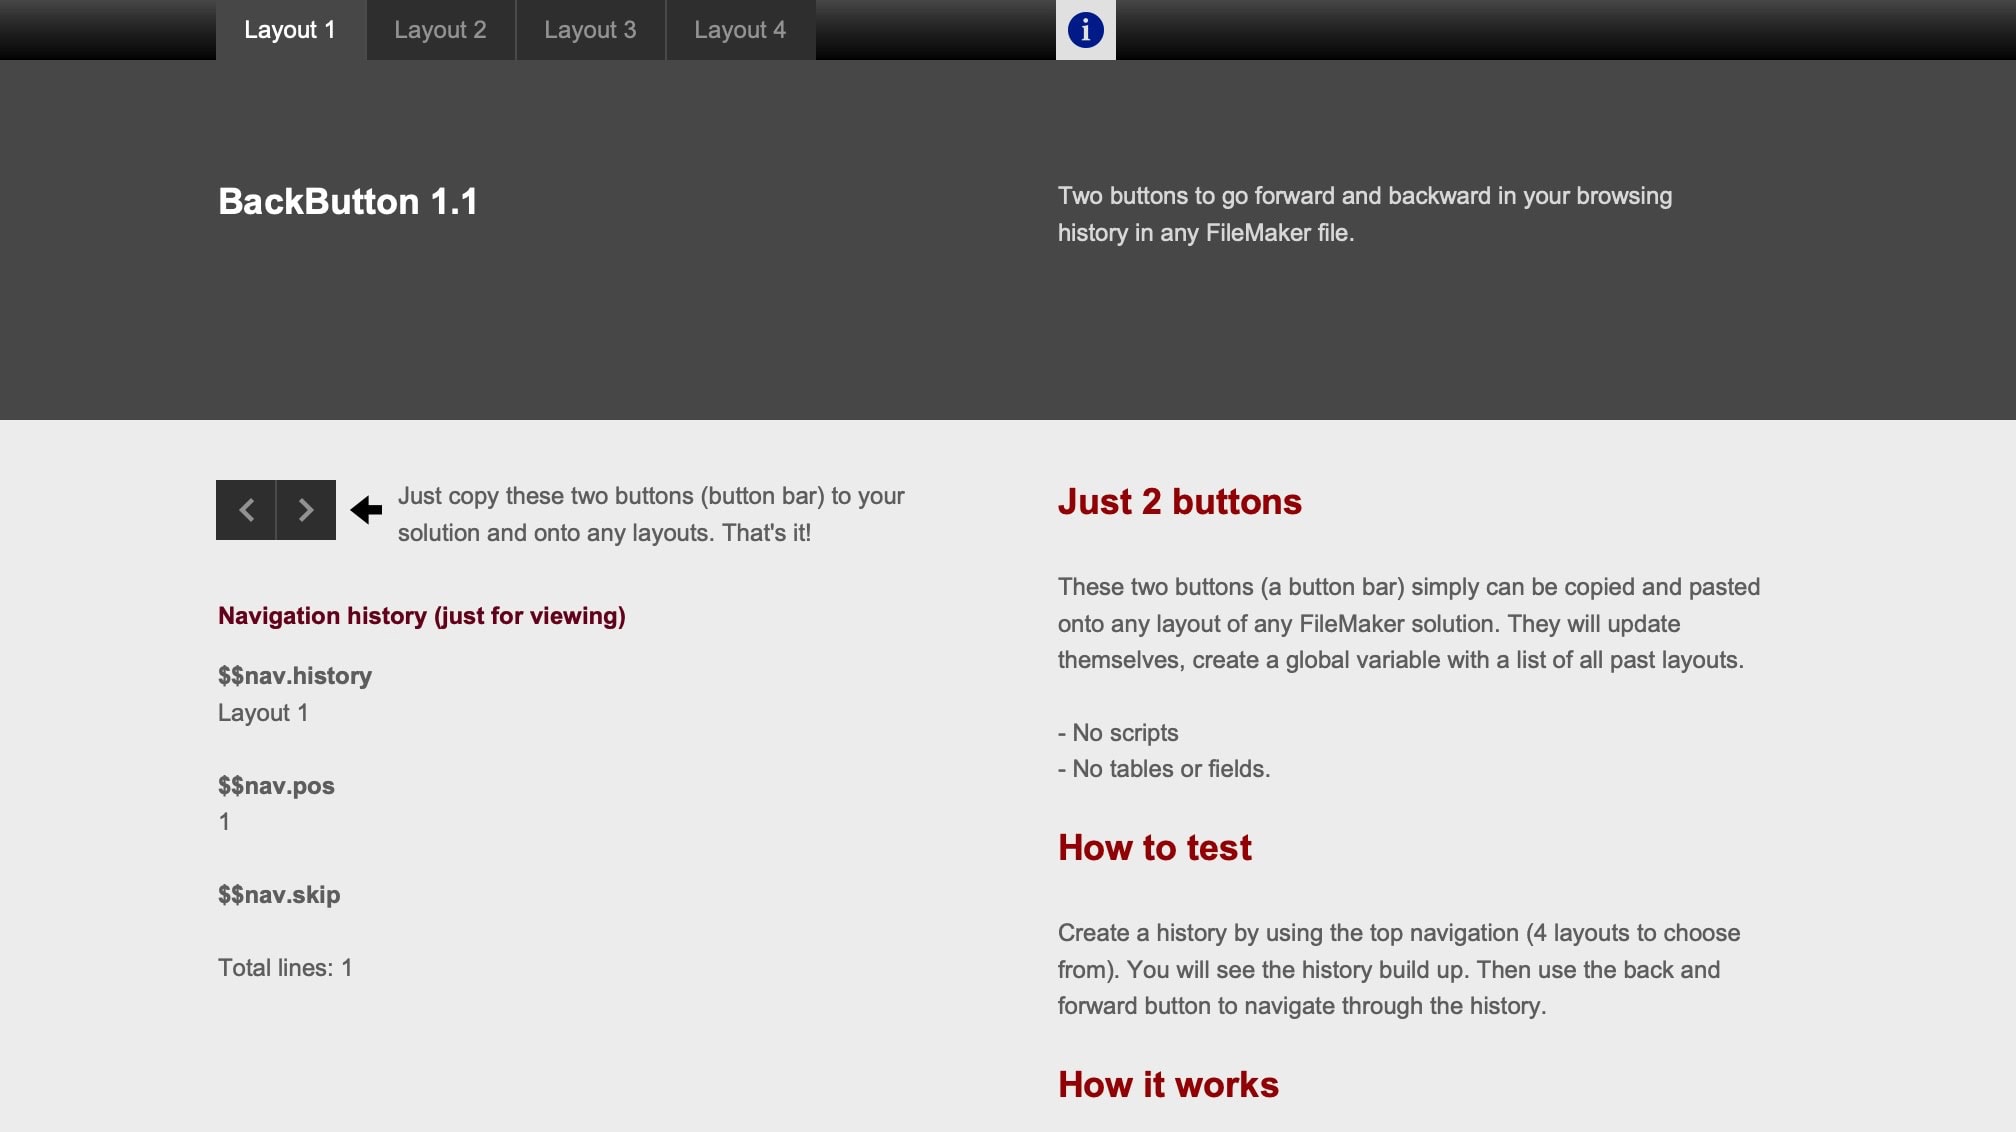
No scripts, fields, or tables
The example attached to this post needs no scripts, triggers, fields, or tables of any kind. It is a single button bar with two buttons: backward and forward. Everything you need is included in this object. Just copy and paste this button bar to your solution, and it will work. No adaptations are necessary for the basic functionality.
I picked up the idea from Paul Jansen many years ago and now turned it into a working solution myself. The idea is simple: use only buttons and nothing else. You need, of course, a global variable to store a history. That global variable can be triggered by a calculation in the conditional formatting of any object, in this case, one of the buttons. Once you have the history, the buttons can use that history.
Each button uses the go-to-layout script step based on a calculation for the name of the layout. That name is taken from the global variable storing the history. It works like this:
- Paste the button bar to all the layouts of your solution
- Navigate through your application with your navigation, which will build the history
- Use the Forward and Back buttons to navigate through the history.
The button bar has the calculations to create the history. Therefore, you must paste the buttons to every layout it should be able to calculate. The history is stored in a global variable; thus, it is available throughout the application and as long as the session runs.
A simple back button for any FileMaker solution. Just a button bar with 2 buttons. Nothing else. No scripts, no tables. Just copy and paste to use.
Requires FileMaker Pro 20 or newer to open.
Do you like this idea? Share it with your team, friends, and colleagues.

Create your own FileMaker starter file
Why should one create their own starter file? There are a few situations where that may be useful. Here are some thoughts on why and when a starter file can be interesting for your situation.
Developers create a starter file
On several occasions over the past few decades, in local and international settings, I have asked fellow developers if they created a starter file for themselves. If so, why did they do that, and if not, why do they refrain from it? The answers were as varied as there were people present.
Seasoned developers had totally different settings in which they worked. Some had a single client and worked for decades only for that specific client. Others created standard software solutions, which they continuously improved. These working environments didn’t need any starter files due to a lack of new projects. There was simply no reason to use a starter file.
Others repeatedly told me that each project was different and no starter file could cover the different needs. Usually these were larger projects with many stakeholders.
Still other developers did create starter files for themselves. They regularly started new FileMaker projects. Each new project had basic demands, like navigation, text label management, user management, and the like. To build these functions from scratch for each new project had some drawbacks: It took time, even when copying bits and pieces from other projects; it was prone to bugs (like any development); and it was repetitive work for basics a client doesn’t even think about. A starter file solves these questions.
Using your expertise
Starter files require time to build. The time you put into creating such a file does pay for itself, as it simplifies new projects considerably. Starter files can be maintained, updated, and enhanced whenever you learn a better method. Creating your own starter file is helpful as you can add functionality you already developed and are familiar with. Your own starter file can cover your personal preferences. Each time you update a starter file, the next project will benefit.
To be clear, this is not about creating ready-made solutions. It is about functionality in the background. Think of a basic theme, a basic structure for your next project, utilities like search functions you always use, or more demanding basics like a user management solution or a dynamic navigation. All these things require substantial work to figure them out, test, and improve them. If you put these things into a file, you can start a new project by duplicating that file and rely on proven functionality.
Prepare for every scenario?
What should a starter file do? Only you can define that for your situation. However, I have seen people preparing for every possible scenario and by doing so, creating a huge starter file. If that feels good to you, go for it.
Personally, I think you cannot prepare for every scenario, and your next project benefits from a sleek setup. You might have a smaller project. There is no need to start with a huge file for a small project. Less might be more. Considerations of what needs to be part of a solution are helpful. One does not strive for perfection, but for usability. If you have a smaller starter file, you need not reduce the functionality but can simply refrain from using certain parts. That doesn’t create a bulky overhead. The file is small anyway.
As I have upgraded my starter files over time, I also came to the conclusion that a clean setup benefits from a modular approach. This allows you to create a navigation as a single part of your starter file, which can easily be replaced or enhanced over time. Another constructive idea was to put settings in a dedicated interface for the developer. That greatly improves efficiency, as settings once hidden in scripts were now openly visible. Everything became easier to manage and more about configuration.
Configurations also answered the idea that every project requires a different approach. If configurations count for that, a starter file can be used in multiple and different scenarios.
Start building
I also met FileMaker developers, who said they wished to have a starter file for new projects but did not have the resources to make one. Some asked around and found other developers willing to share what they had already assembled. Another option is to purchase a starter file, as offered on this website, and use that as a starting point.
Over time, any starter file you start to use will be enhanced. You will improve it, change it, or enhance it. That is precisely what should happen. You should make it your own. The most important thing is to start, however limited it is at first.
What I typically see is that having a working and reliable starter file gives you an advantage. If you speak with a client on a new project, you probably can cut weeks, if not months, from the development time by using a starter file. You also could use a FileMaker starter file to quickly assemble a navigable mockup for a new project (RAD, Rapid Application Development) and present it the next day and ask something like, “Is this the workflow you had in mind?”.
Learning FileMaker
There is yet another reason to build or purchase a starter file. To start building a starter file can be seen as a personal development project. Learn to become a better developer. Nobody knows everything. A starter file is not a client project, more like a playground for your personal ideas. While building a resource, you become a better developer. Enhance your skills and create something useful. Select the functions you think are needed most. Build from scratch or copy and paste from older projects, then enhance and test.
If you are new to FileMaker, you benefit from other developers. They can help you get started and help you solve issues you encounter. You can book a course, “of course”, or work for certifications. A different hands-on approach could be the use of an already assembled starter file. By using one, you look, so to speak, over the shoulder of another developer and see how they did something. You also have a working starting point for your next project. That might be quite efficient to learn how to use FileMaker.
Create a starter file for FileMaker
Figure out what building blocks are useful for generic requirements
Consider condensing your experiences so far. That will help you to see basic needs. Basic needs are probably useful in any project. That’s why they are called basics. Make a list to start your personal starter file.
- Navigation?
- Multilingual?
- Central text label management?
- User Management?
- Basic user roles?
- Basic user rights?
- Security settings?
- Custom menus?
- Custom functions?
- Basic design?
- Project structure?

Understanding FileMaker Custom Functions
FileMaker Custom Functions are something you can create as a solution for a repeating issue. Once created, you can easily integrate custom functions into other projects by simply importing from another file. Let’s talk about how to create a custom function.
Accessing Custom Functions
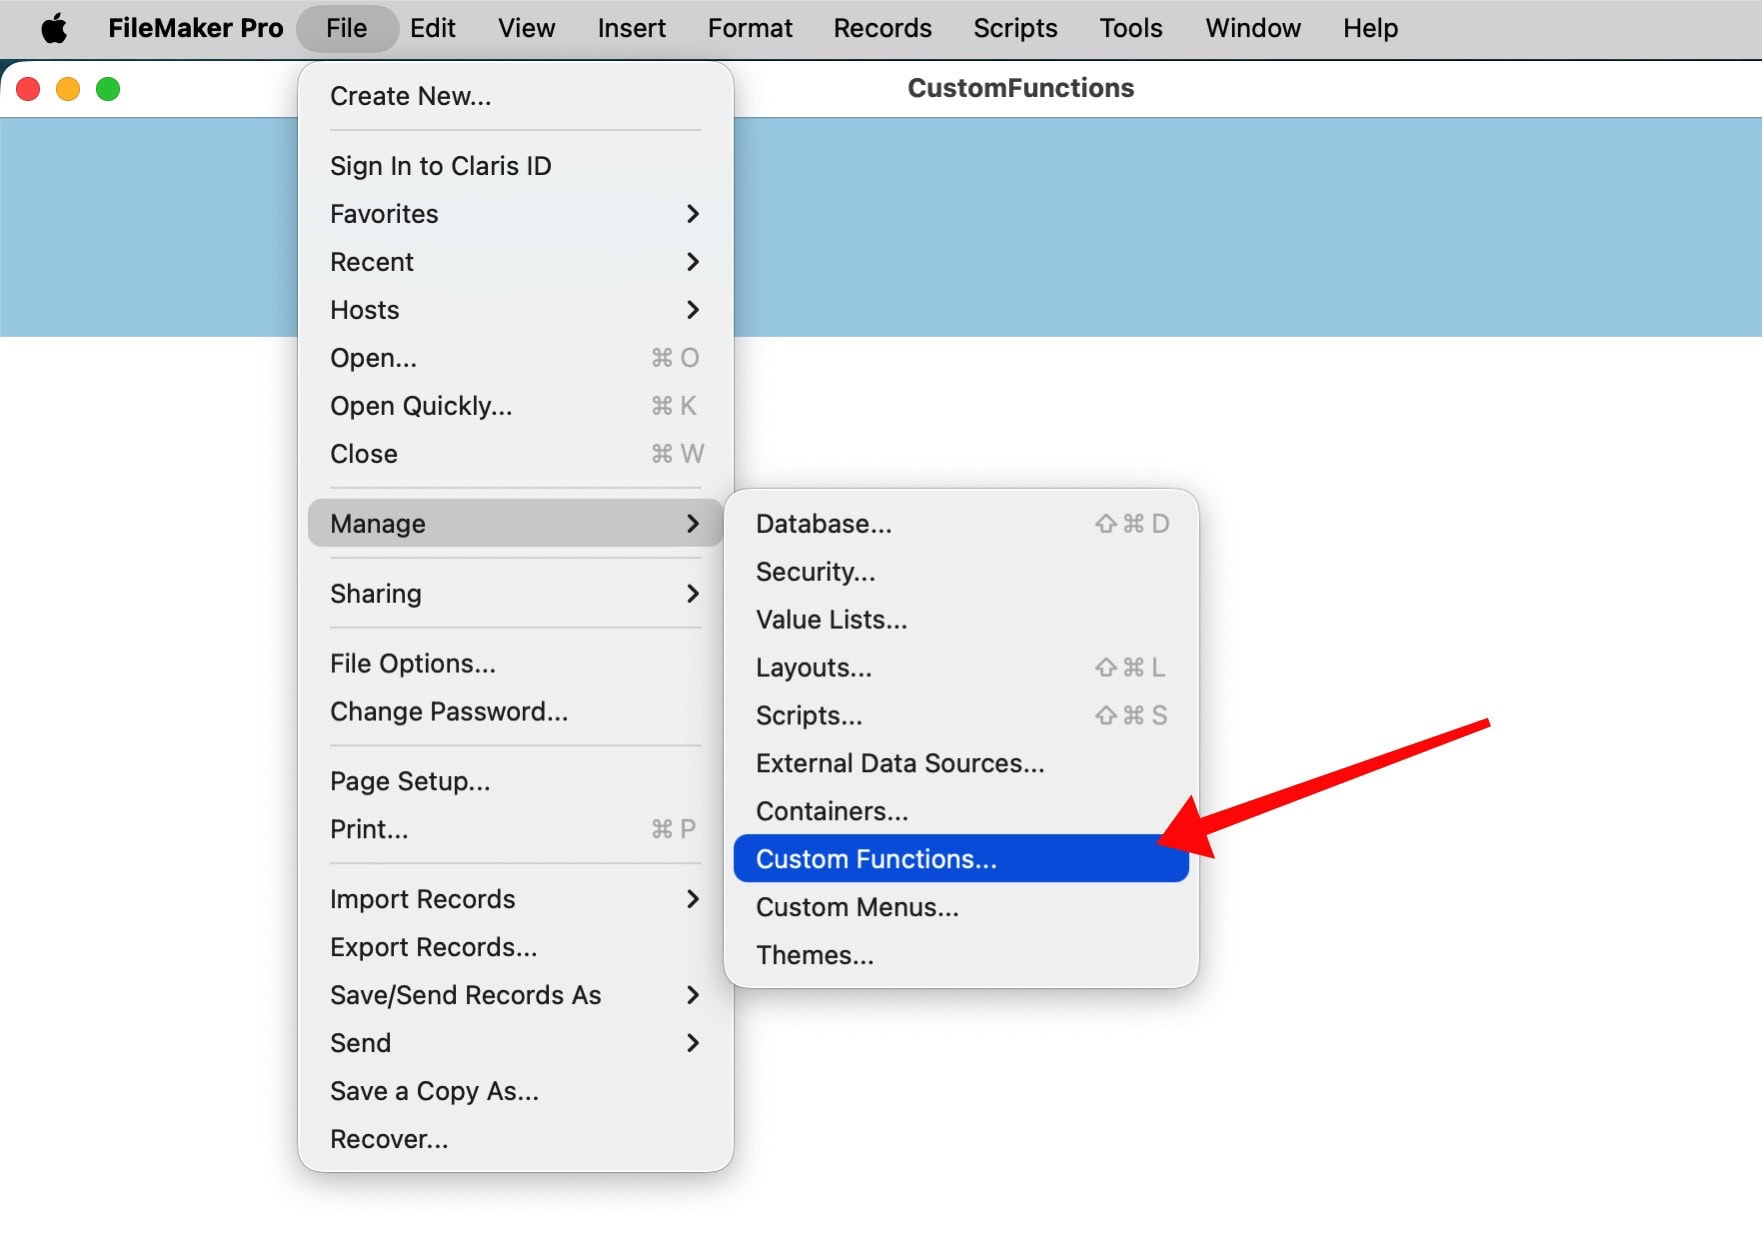
Custom functions are stored in FileMaker files. You must have an open file to be able to access custom functions in the menu > File > Manage > Custom Functions:
Once you access the Custom Functions, a Custom Functions window is presented with all currently available custom functions in that specific file. The screenshot below is an empty window, as the file was newly created and has no custom functions yet.
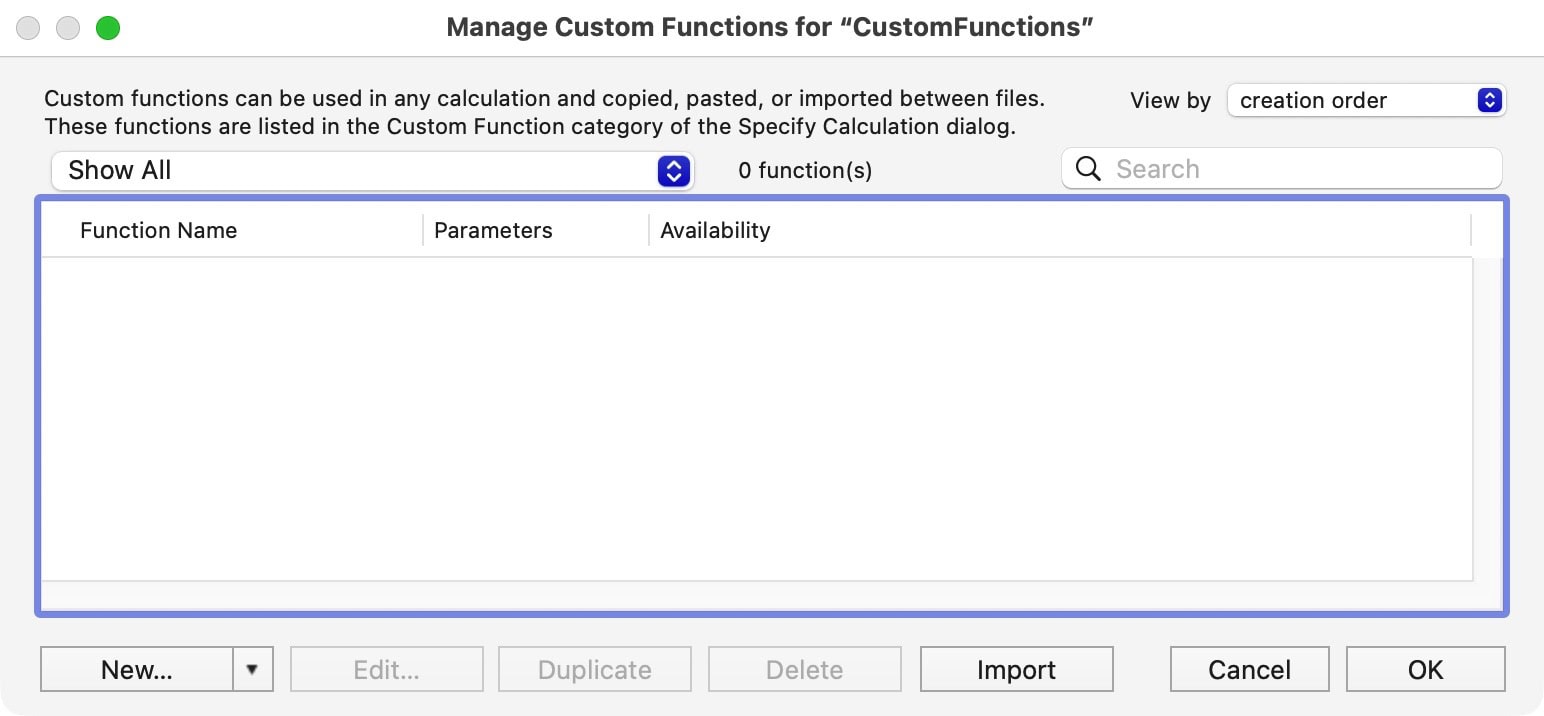
Custom functions can be used in scripts or in single script steps like “Set Field”, just as you would use regular functions in scripts or script steps.
Considering Custom Functions
Custom Functions are functions, just like script steps are functions. However, script steps cannot do everything you probably need. While scripts can cover much of the functionality, you might want to consider writing your own custom function for that purpose. Here are some reasons you might want to do that:
- Custom Functions are simple in concept: define an input, create some logic, and serve an output.
- Custom Functions do not depend on tables, layouts, or scripts.
- Custom Functions are perfect to simplify repeating tasks.
- Custom Functions can easily be shared among solutions.
Custom functions can do some of the heavy lifting as part of a script. That need not be complex. Custom functions can be basic. To explain custom functions, we start with the simplest of ideas and then gradually build more demanding solutions.

Example 1: Simplest version
Here is a simple approach: create a new custom function in the window mentioned above. There are a few things to do:
- Give the custom function a new name. I call it “TransformText”.
- Add a new parameter. I call it “Input”. The click on + to add the parameter to the list of parameters
- Add the logic. I want to transform the text style of that input to ALL CAPS. I use an available function to do that, which needs the definition “Uppercase”.
The screen now might look like this:
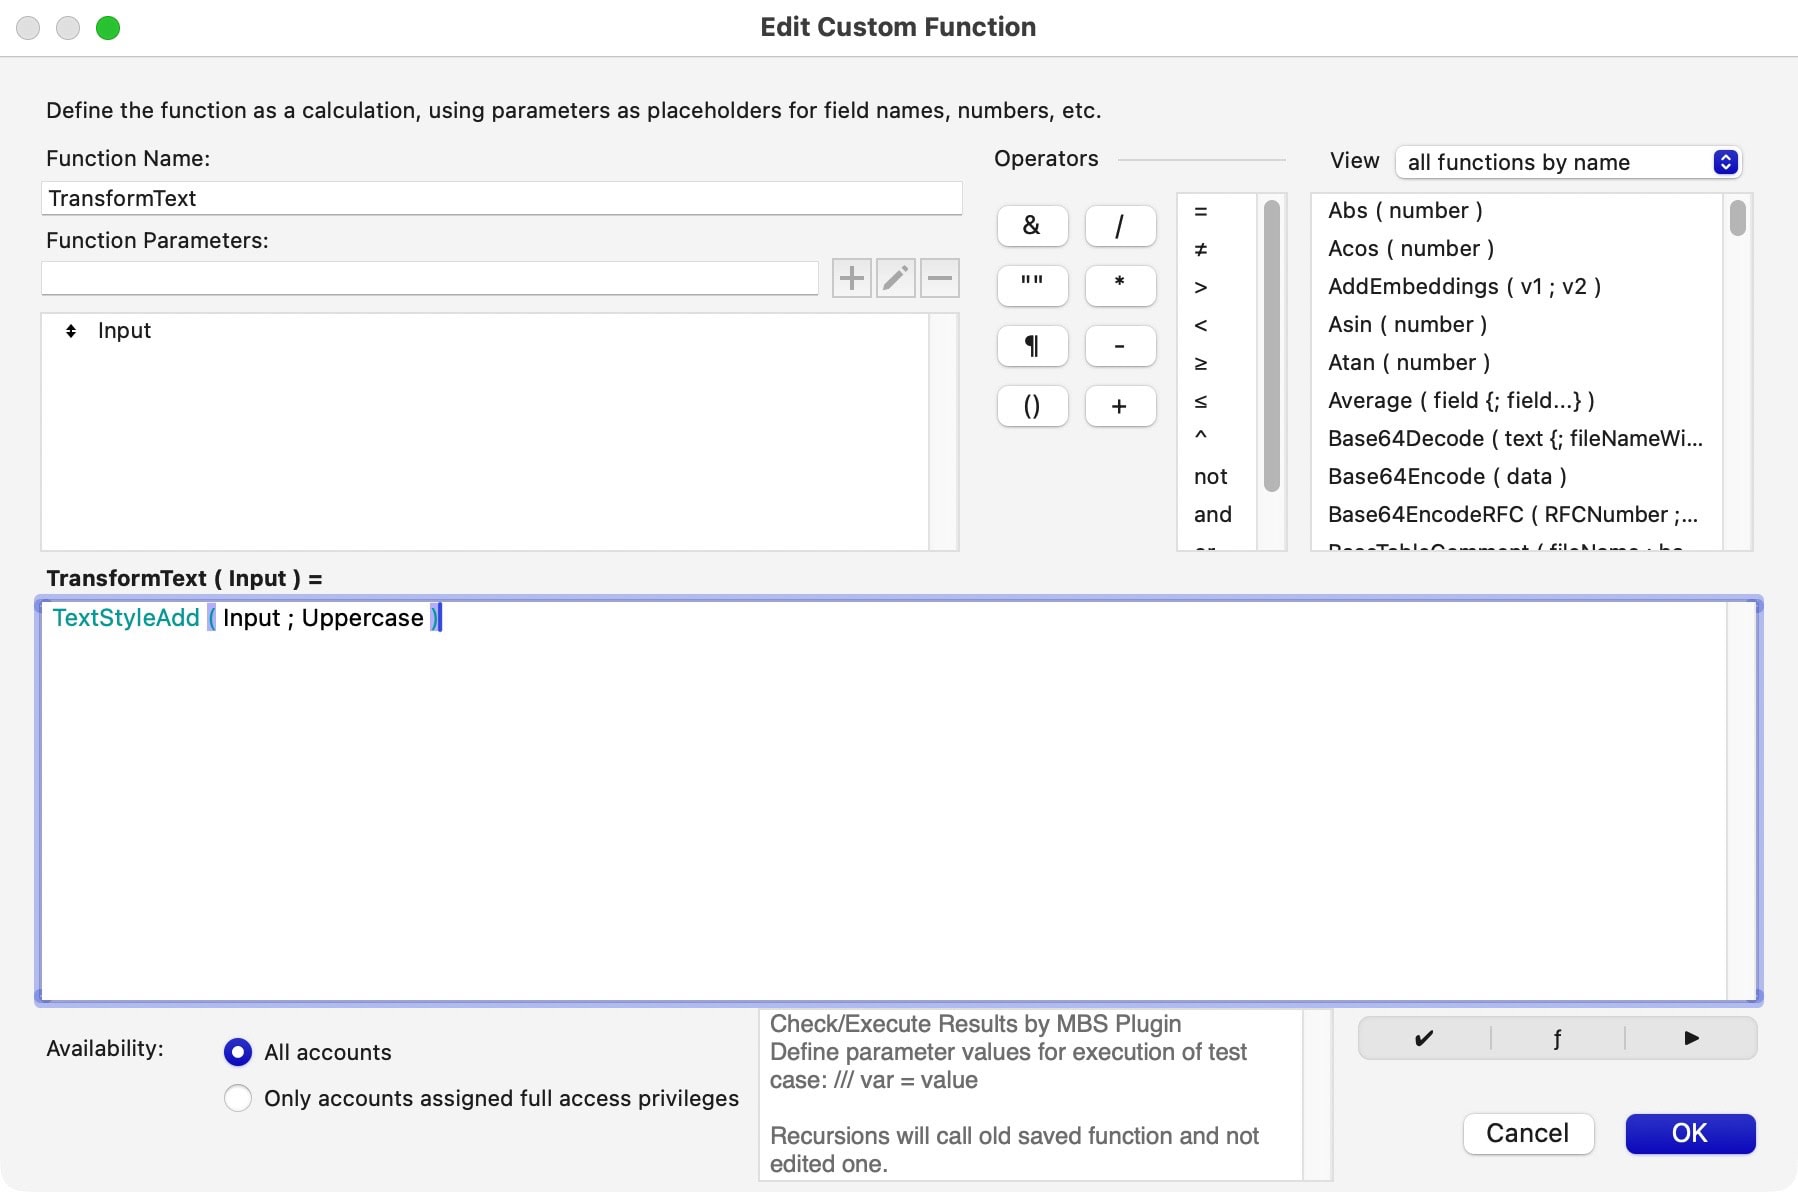
The custom function is ready. While this is probably nothing you would ever create for yourself, and you might question my sanity for providing such a basic function, it serves a single purpose: to explain the concept. It is not about being fancy but about enabling you to understand its workings so that you can start using it yourself.
In the background I have my sample file, where I created two global fields called gInput and gOutput. What I want to do is to type something in the field Input, then click a button which will then use the custom function to create an output that is written into the field Output. The result looks like this:
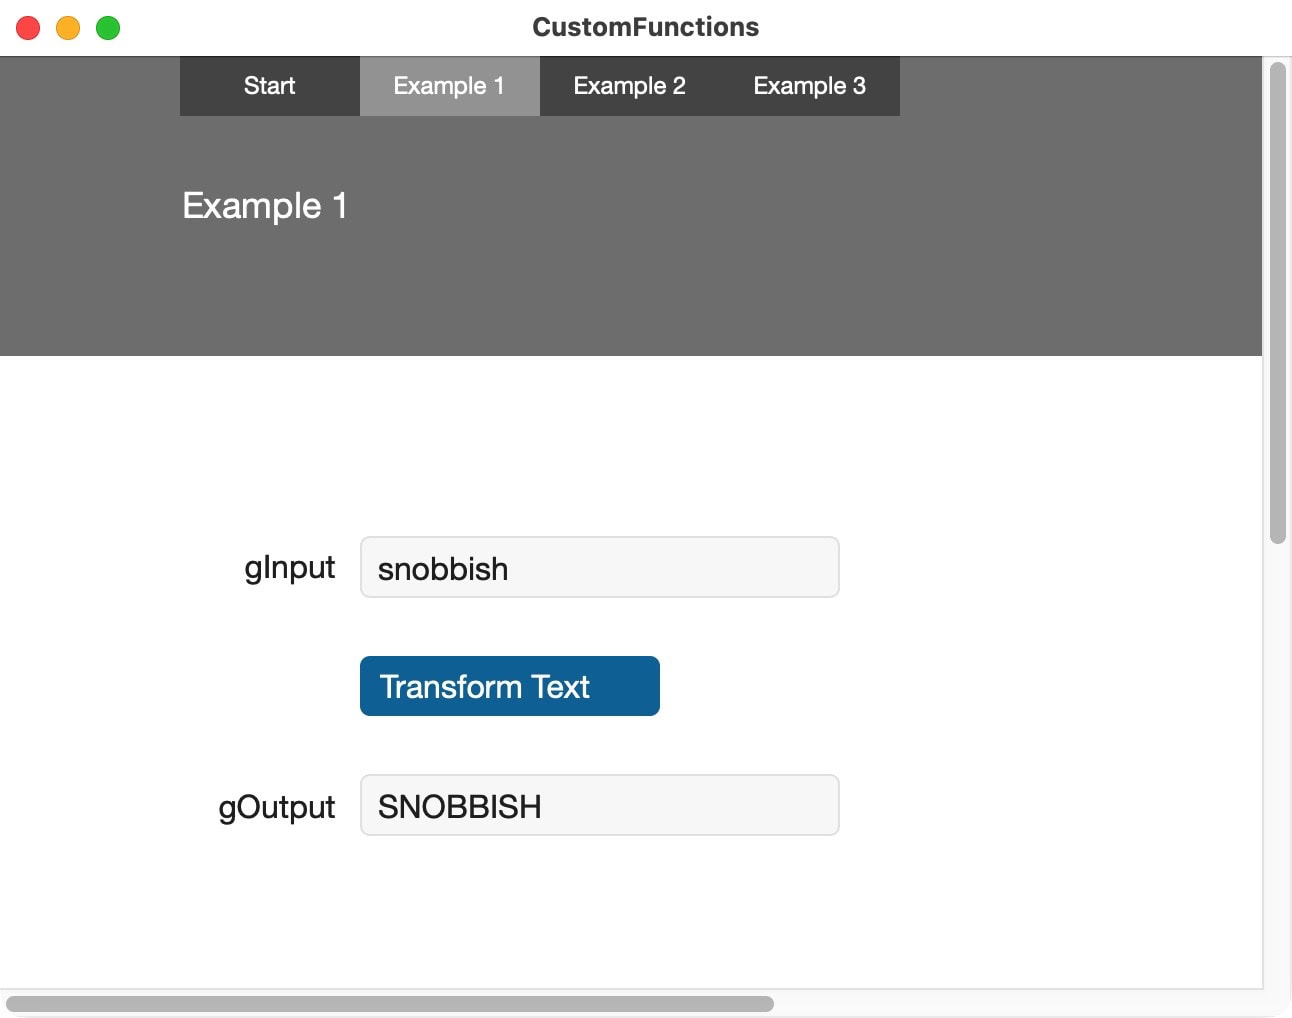
This simple example highlights the three components needed to create a custom function:
- Input
- Calculation
- Output.
How to up your game
Custom functions can be enhanced easily. The limits are only set by your imagination. From a single parameter, you can go to multiple parameters and from a single calculation line to complex settings. In daily tasks, custom functions are used to create consistent results in a simplified way.
Multiple parameters can be useful if you have stored settings in a field. You can refer to settings and let your custom function handle the differences in calculation. Calculations can evaluate settings with IF-contexts or WHILE-functions. Just anything that would work in a script calculation can be applied to a custom function.
Once you have tested the custom function and the results are rock-solid, you can simply rely on its working. Let’s get into a slightly more complex calculation.
Example 2: How to upgrade the calculation
A slightly more complex example is this one: Let’s figure out on what weekday the first of the next month is falling. You can do that by a script, but if you want to reuse such a function, a custom function is probably simpler.
The function Get ( CurrentDate ) will return the current date. It consists of 3 parts, Day, Month and Year. Each of those can be extracted with DAY ( Get ( CurrentDate )), MONTH ( Get ( CurrentDate )) and YEAR ( Get ( CurrentDate )). This will return the respective numbers for the day of the month, the month of the year, and the year with 4 digits.
I have added fields for the Date, the Day, Month and Year to the table. The 2nd example layout presents it like:
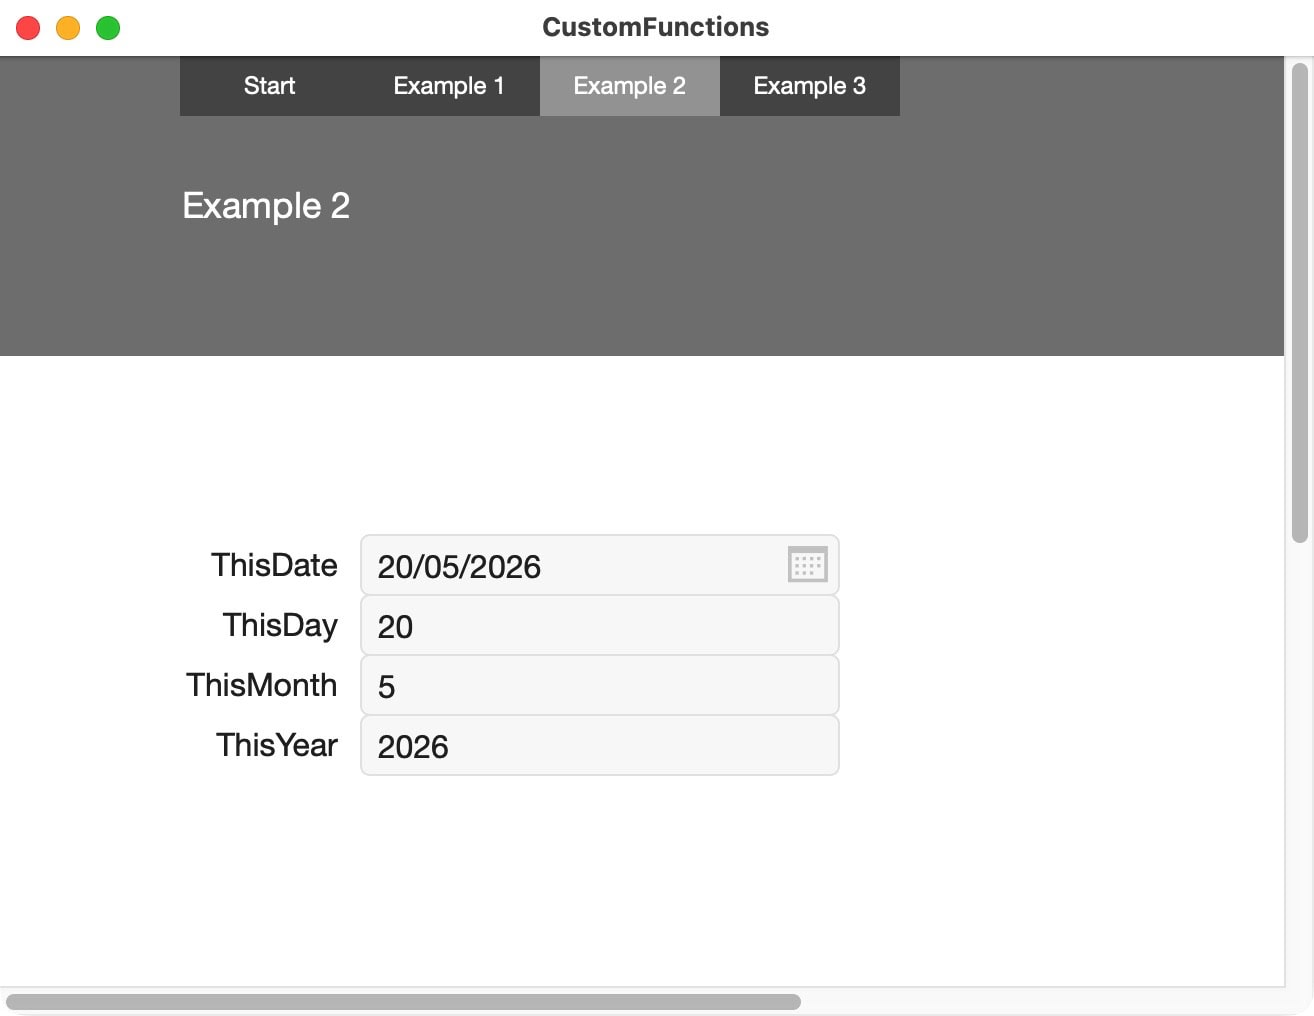
The next month would be the current month + 1. The first day of that month would be 1. The year initially would be the same, unless the current month is 12, in which case the next month would become 1 again and the year would be upgraded by 1 as well. Now you can start creating the custom function. Within the custom function, you do not need any field, but probably the DateField can be referenced. The rest can be calculated directly within the custom function. We can call the custom function: FirstDayOfTheMonth. As a parameter you can create ThisDate as input.
The simplest approach is to calculate the result directly from within a new Date function. Within that function, the month is upgraded with 1, which automatically will move the entire formula to the next year if needed (due to FileMaker functionality, no need to enhance).
Date ( Month ( ThisDate ) + 1 ; 1 ; Year ( ThisDate ) )
This example uses the date formatting for the US. It works, but be mindful about interpretations within calculations, text, etc. There is another article addressing date issues worldwide:
In the following screenshot and in the example file, I use the basic custom function to create a more differentiated feedback. Check the scriptstep for the button “First Day Of Following Month” below.
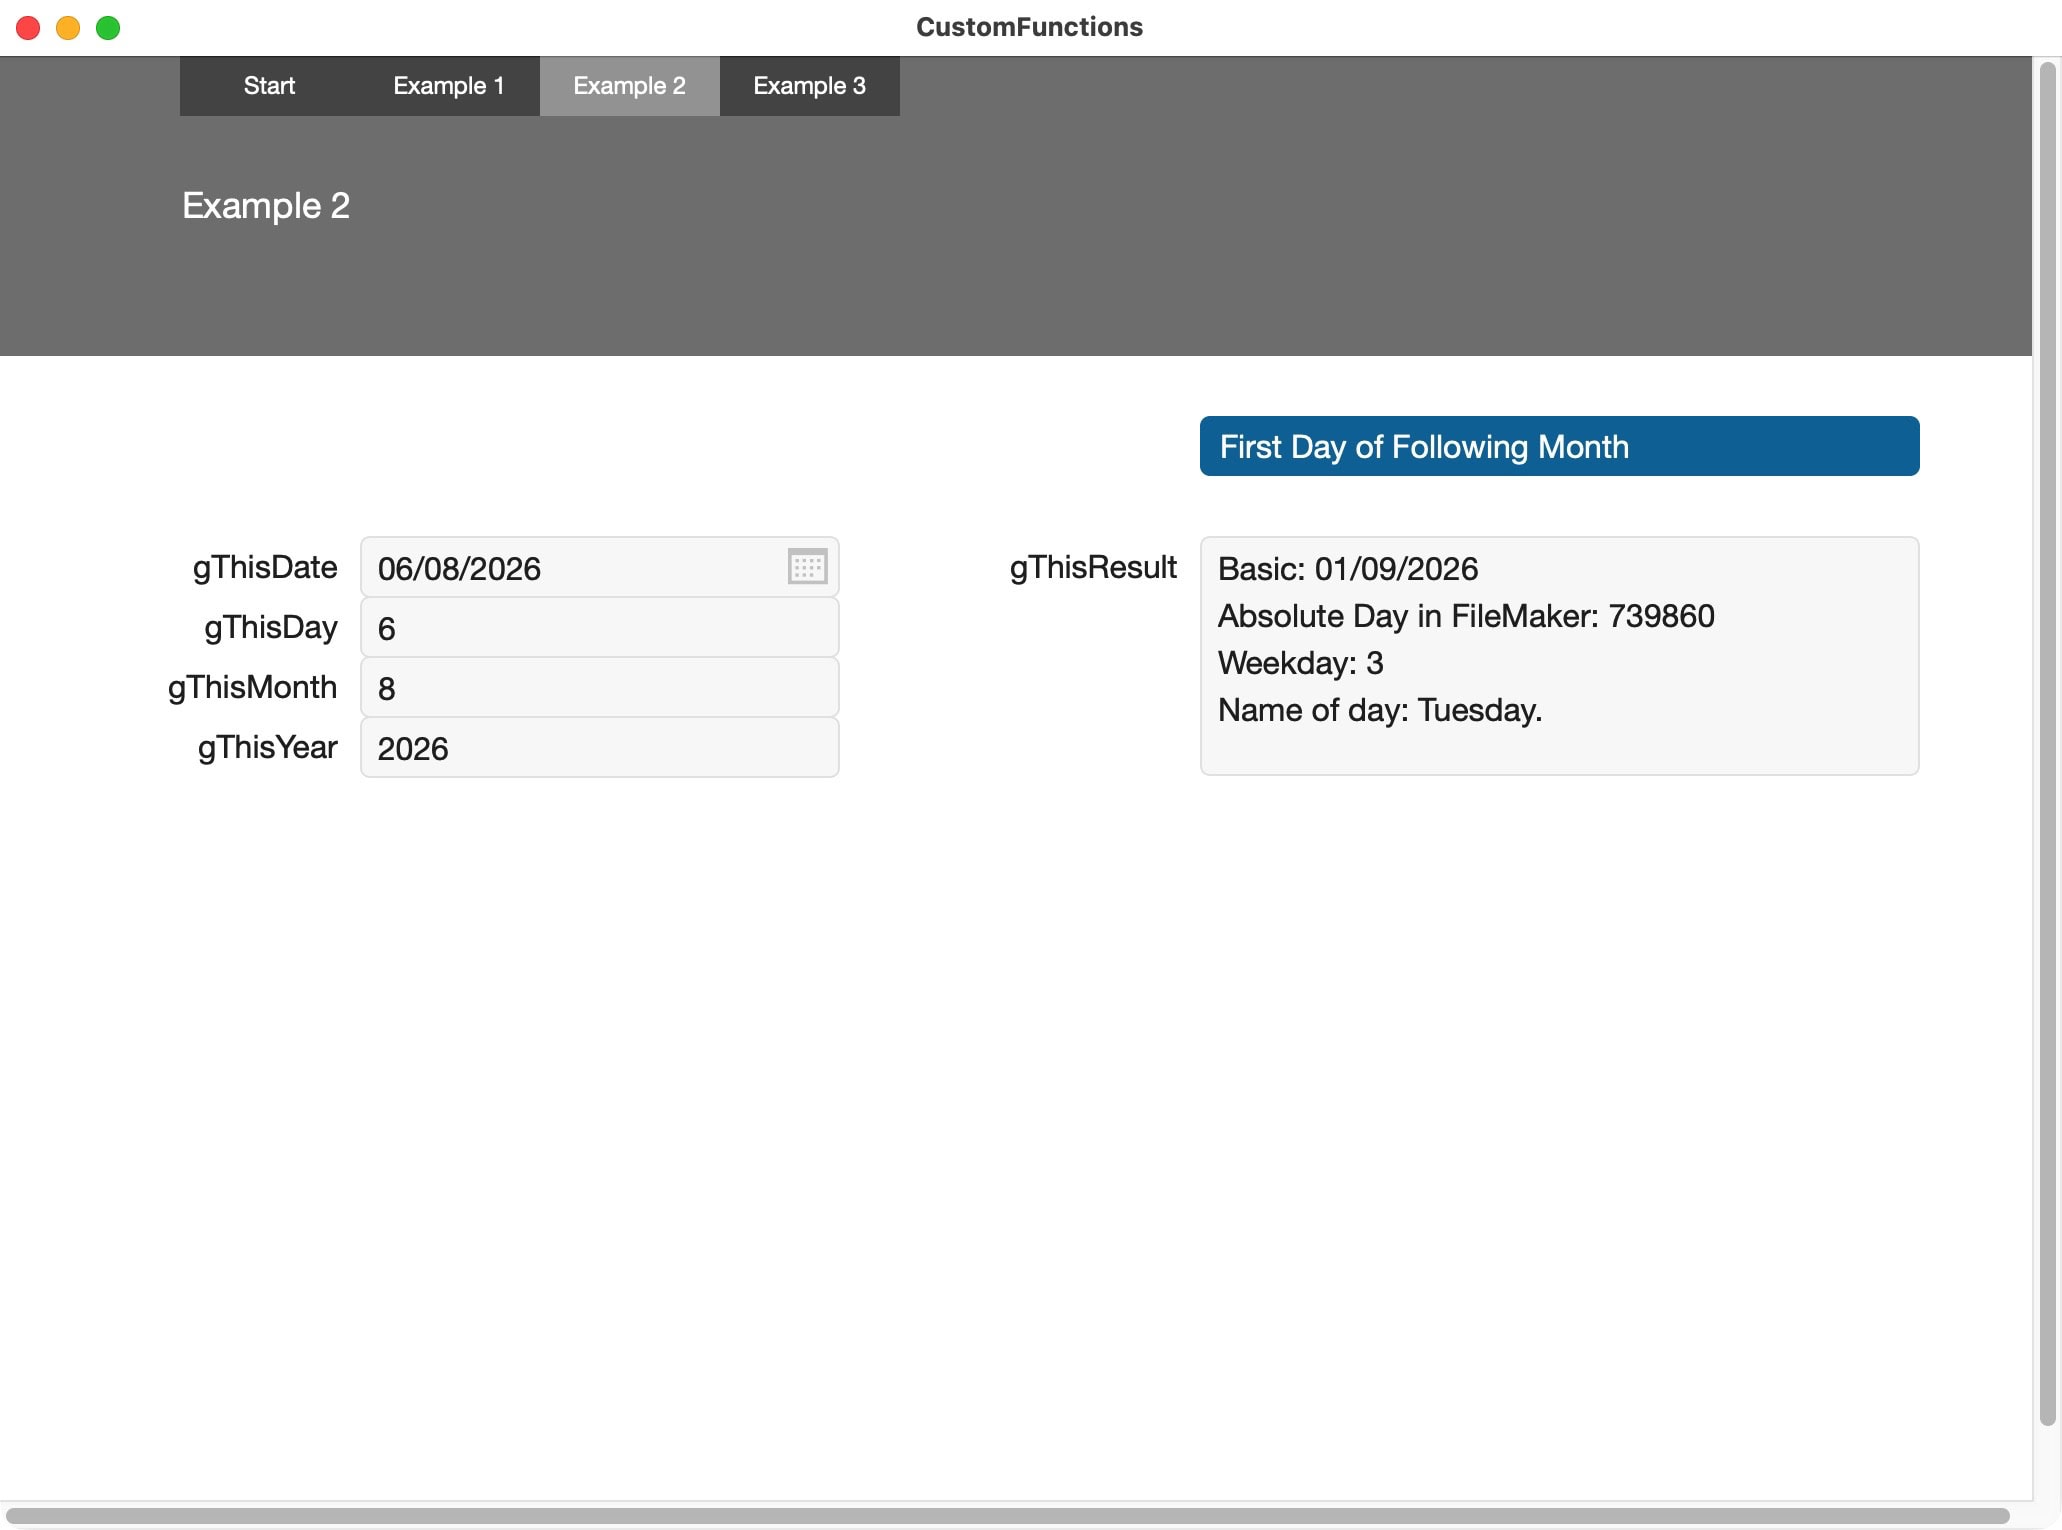
This second example is slightly more complex, and dates should be handled with care in FileMaker. We are now coming to the third and last example, where the task is seemingly simple: reverse the characters of the entered word or phrase. This is something I stumbled across when using layout software that did not support right-to-left writing.
What happened? When pasting text, the software reversed the order of characters for any words and phrases written in a right-to-left language. It simply reversed the order of the characters when pasting the text. How to deal with that? As the layout software did not support proper typesetting for certain languages, I had to find a solution to reverse the reversing. I needed a simple tool. FileMaker to the rescue! Create a custom function that helps to reverse the characters of any text string.
These and other scenarios can benefit from simple custom functions.
Example 3: Reverse the characters of a string
We create a new custom function with the name: “ReverseCharacters”. As a parameter, we need a text input. We call that parameter: “TextInput”. Recursive functions are well possible within FileMaker. Using a custom function simplifies an application. Here is a version using the While-context:
While (
[ result = “” ; i = 1 ; n = Length ( TextInput ) ] ; // the initial variables
i ≤ n ; // condition to check
[ result = Middle ( TextInput ; i ; 1 ) & result ; i = i + 1 ] ; // calculation and loop
result // at the end. output when the condition no longer applies
)
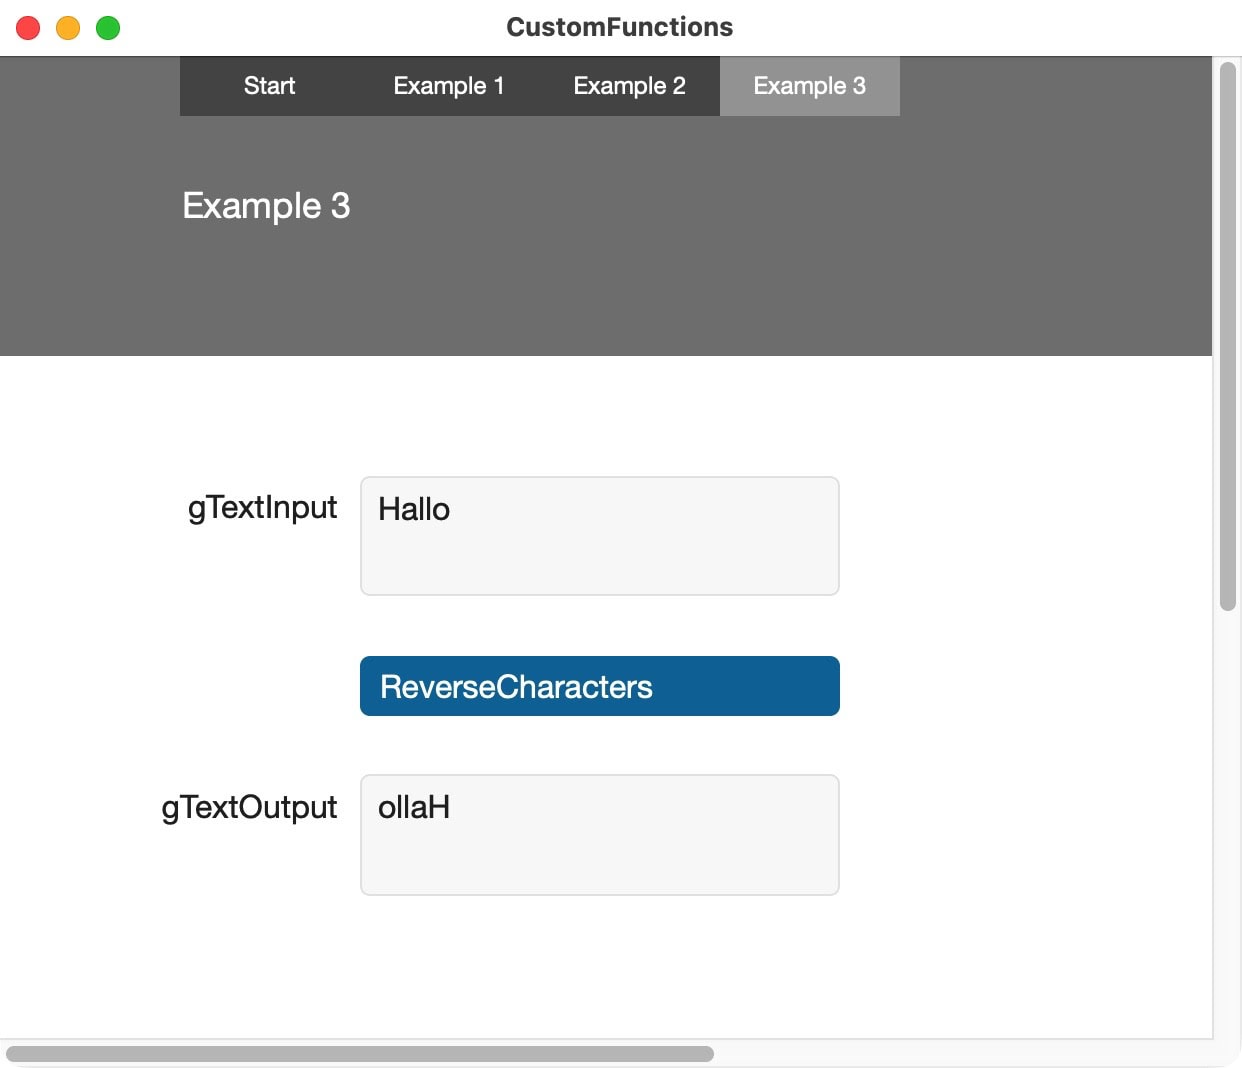
This third example is a bit more technical. Please refer to the sample file to see how it is done.
Resources
Custom functions have been around for a very long time. As a result, many developers used them and shared their tools and insights. If you want to learn more, you can also search for solutions on the web. A great resource is the Custom Functions Library maintained by Brian Dunning. You will find tons of solutions by many developers. At the time I write this article, there are over 2600 functions available. All are easy to integrate and frequently there are different takes on similar subjects. Have a look:
Custom Functions and AI
Finally, custom functions today are easy to develop with AI. While much of FileMaker’s functionality is hidden from the developer or linked to tables and layouts, custom functions do not have these restrictions. They work independently from restrictions, and thus all the logic is just a text. That is a perfect starting point for exploration with AI.
Describe to AI what you need, that you need it as a FileMaker custom function, and it will work this out for you. This simplifies a lot of the work. Also, as custom functions are easily updated by simply copying and pasting from a chatbot directly into the calculation field of a custom function, it hardly can be beaten in simplicity. If you hesitate to work with AI, give this a go.
How to create FileMaker custom functions? The article and accompanying sample file help you to get started.
Minimal requirements: FileMaker Pro 20.
FileMaker Design Basics
Every FileMaker developer has to deal with design questions. In FileMaker, every interface detail, every layout, is based on a table. Creating a function without a layout eventually will need a button or something like that to start that function. As FileMaker offers both logical components and visual elements, it is probably not enough to be a good engineer only. You need design skills.
What’s an interface?
You might be an engineer, and that’s what you are good at. Your customer is not interested in what or how you do something. It only needs to see that “it” works, and it needs an interface to interact with what you created. For the client, the interface frequently is the only thing they see from a development. The engineering might be terrible, but if it works and the interface is great, you will likely have no complaints. However, if your engineering is fabulous, solid, and actually breathtaking, you might be stunned to see the client react to visual details he does not understand.
The interface is the central part you sell to any client. It answers questions like: Can I find what I look for? Is it intuitive? Is there enough information visible, or rather too much of it?
Struggling with design
I saw many developers struggle with the concept of design. Not surprisingly, engineers are good at engineering, while designers are good at design. Rarely do these two overlap in real life. Yet, in FileMaker, both sets of skills are needed, as FileMaker intrinsically links both. You cannot engineer anything in FileMaker without touching the interface. As FileMaker is a low-code platform, it might even attract people who are neither engineers nor designers and see themselves confronted with challenges they never considered before.
Often, the design of a solution gets a backseat during development. That is: Functionality is the first thing to look at. Yet, once the solution is in use, the design probably decides how well the application is received and implemented. If users are struggling with the implementation of the interface, it is just as bad as if something did not work as intended.
FileMaker themes are not design
FileMaker has several tools to implement a design. Specifically, the grid and some layout options, along with the style sheets called themes, are useful tools to create a design. These tools in themselves are not to be confused with a design. They are good helps to implement a design, but using them does not magically create great design.
In German, for example, the FileMaker themes are called “Designs”. That is utter nonsense. They are complex style sheets (“Stilvorlagen”), but nothing beyond that. Applying a theme to a layout does not magically create a fantastic design. That only enables you to style objects with the help of that style sheet. Useful, but using them does not emulate a design degree.
Generally speaking, the job of a designer is different from that of an engineer. To do both tasks requires some learning. Reading books about design, typography, colors, or following some courses might give your understanding a boost. While FileMaker by far does not have the tools of regular design software, it does give you quite usable tools to implement a design of your choice or of something an actual designer created for you.
Now here is the tricky part: creating a good design frequently needs both the engineer and designer. Not everything an engineer can think of will translate well into a design, and not every design choice can be adequately used in a software context.
A good design needs less support, smaller manuals, and frees both users and developers from numerous headaches. Steve Jobs famously said that “design is how it works”. That does not mean that users will think like engineers and are willing to learn to think like an engineer. It is rather the engineer, who not only has to create the functionality but also the user experience by a great design. If that doesn’t come naturally: learn.
FileMaker Design Basics
We just opened a new YouTube channel for FileMaker videos. The first video launched is about FileMaker Design Basics. It will introduce you to some basic thoughts and explain some basic tools in FileMaker to help you create better interfaces.
Learning about Design
There is no trick for good design, just as there is no trick to being a good engineer. Each has a wide array of skills needed for the job. If you want to create music, you need to learn to hear, even in between the notes. The same applies to software interfaces. It is not just about the buttons on a layout or the fields to fill in, but how they interact, knowing where they are useful and where distracting.
Interface design is like typography; it is probably best if not even noticed. Reading a book or using software is the goal. If the user stumbles over bad design, it will slow down reading, or the bad experience can even lead to resisting the book or software. A good design is most likely the critical part for user acceptance.
What makes up good design?
That is a similar question as «What is good music?» Many will point to their favorite artists. By doing that, they explain it is frequently about taste. But good design is not about taste or style but rather about how it performs, what it does to the user, and how it enables you to transport what you engineered for their experience.
What good design is not:
- It is not about taste
- It is not about being pretty
- It is not about excessive use of colors
- It is not applying a FileMaker theme (design and understanding come first).
Good design is relying on:
- Simplicity
- Consistency
- Guiding without explaining
- Location (Orientation in the application).
How do you want to improve your next FileMaker application?

How to create a dynamic navigation in FileMaker
How do you create a navigation in FileMaker? It is easy to place some buttons on a layout or use button bars, but these are usually not very dynamic. Defining buttons or elements of a button bar requires quite a bit of editing. How do you create a better type of navigation, which is simpler to edit and maintain?
There are several ready-made solutions, both free and commercial, available on this website. We get to these at the end of the article. First, let’s talk about concepts.
Concepts for a better navigation
The closest thing to a menu that FileMaker offers is menu bars. Still quite a few developers stick to buttons that are added to the solutions as needed. The issue is clear: while buttons and button bars work, they remain isolated solutions for each page. Dealing with buttons or button bars usually requires editing those elements on multiple pages and for each occurrence. To change that, you have to centralize the editing. That will simplify editing and reduce possible errors. As we are working in FileMaker, centralizing editing is easy by creating a navigation table to manage all navigation items. That would be step one.
Another issue is the simplicity and availability of the navigation. Instead of creating buttons or button bars for each layout and adjusting them, one could imagine a single solution with global application within your app. Global means copy-and-paste. No further adjustments or relationships are needed. Step two would be: globalize.
These are the two main steps you probably want to achieve to simplify your setup:
- Centralize
- Globalize
Ai-generated image.
Centralize
To centralize your data, think of a navigation table. The table would have all the entries of your navigation. In its simplest form, there are two fields: a label field and a target description field. The label has the name as it appears in your menu later, while the target description field either has a name or the internal number of that layout.
It would work like this: You have a menu showing labels, and by clicking on any entry, you trigger a script that routes you to the target layout. That is the idea.
Of course, this is no full solution yet, but a concept one can play with. There are still several ways to achieve this. One of the additional benefits of a navigation table is that it can be enhanced. Think of adding other fields to show or hide entries. Again, in its simplest form, think of a checkbox called “IsActive” with a single value option (value list with the number “1”). If checked, the entry is visible; if not, it is not. You can now sort, find, or exclude entries based on that field. Other options are probably a level of indent to create a hierarchy, group fields to link lower-level entries to higher levels, and allow for collapsing or showing parts of the navigation based on clicking.
Creating all navigation entries in a single table instantly simplifies editing across your app. The next challenge of course is, how to show that navigation.
Globalize
The first dynamic navigation I created was dependent on relationships. I used a navigation table, but there was no global application possible yet. I had to add these relationships to the navigation table as well as to each table occurrence and layout. Though it already was much better than anything I had done before, it still wasn’t a truly global solution. The relationship graph was sprinkled with relationships to display the navigation, as I used the Anchor-Buoy-method. The Selector-Connector-model of relationships would be much more efficient for that scenario.
I still prefer the Anchor-Buoy method for relationships, but wanted to free the navigation from its dependency on relationships. To do so, you need to globalize the concept. FileMaker has global fields and global variables, which function without relationships. Yet, the simplest method is not using any of these.
Card window menu
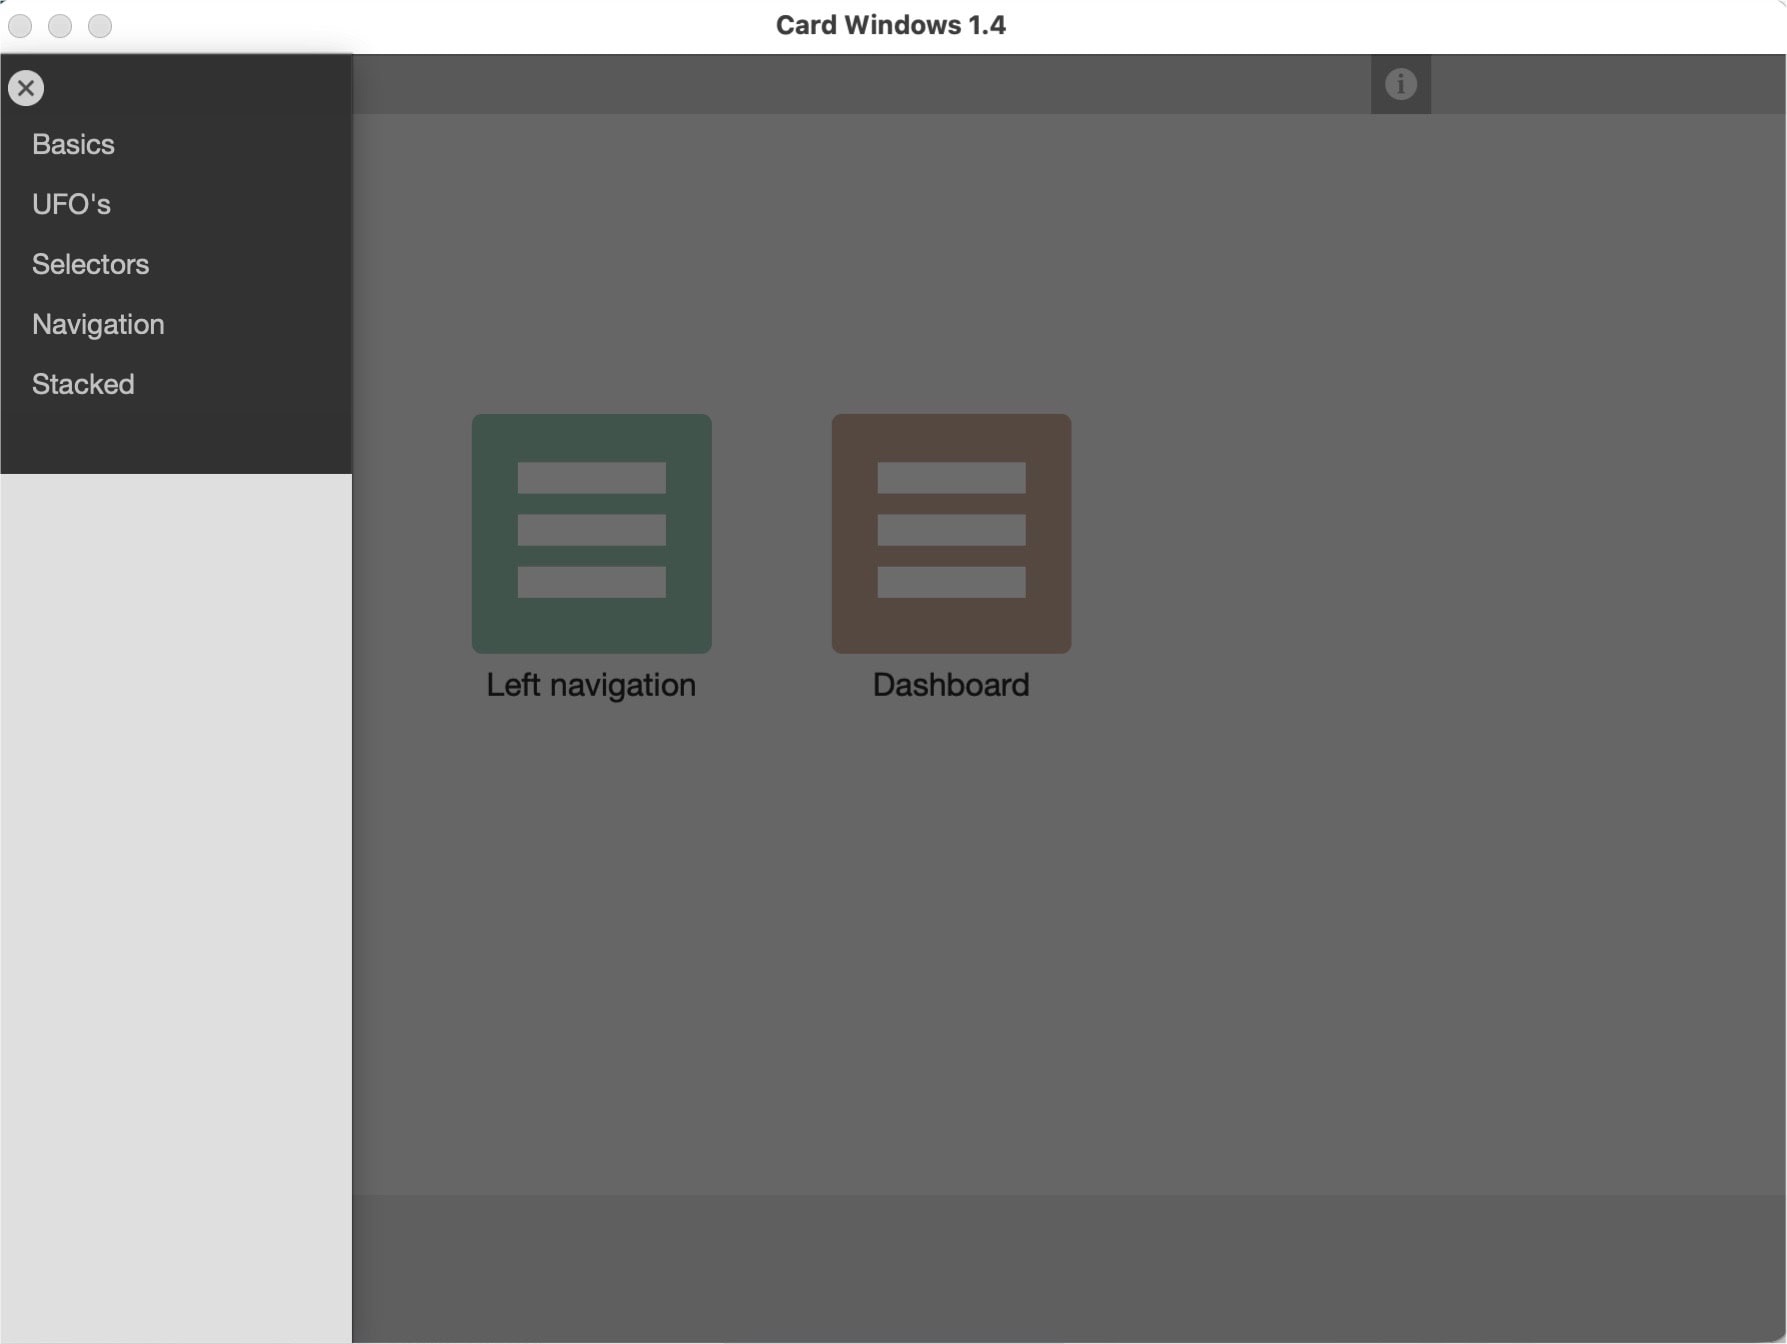
The easiest way to create an independent and globally usable navigation is by transferring it to a separate layout, which you call by a script as a card window. The way to do it is to create another layout based on the navigation table. Make it a list layout, small and high, showing records in list form. This can be a scrollable list. Now create a button to open a new window with that layout and make it a card window. It will open as a menu. Give it a fixed place by the script you call.
When clicking on an entry, trigger a script that first closes the menu, then routes to the clicked layout. This is simple, and its application is universal. The only drawback is that you need two clicks: one to open the menu and a second click to select an item and navigate to it.
In many solutions, the menu is on the left side and mostly visible. This saves a click. On a FileMaker layout, you can only position a vertical menu on a page that is high enough. That might be OK on a layout for editing a record, but it frequently is less possible on a list layout, as it cannot be shown next to a list. In that case, you opt for a variation as described above, which is accessible through a button.
Learn more about card windows and their options through the link below.
Move the navigation to globals
Still considering a navigation table as the starting point, how can you make that information universally accessible? The solution to that question is to store the information in globals. There are two options: global fields and global variables. While fields are based on a table, variables are not. Both can be set to be global, which means there is only a single value that is accessible from anywhere without the need for relationships.
Global values behave slightly different if you open a file locally or from a server. In a local environment, the global value of a global field is stored in that field. It is good practice to not set a global field to have any values but set the values by a script or script step. That way you can control the content of that field. In a server setting, global fields are ideally set at startup or when needed. Global values persist as long as the session runs and you close the file. Global values or session-based; that is, each user has their own globals.
Now load the navigation table records into a global field or variable. Depending on what you choose, the mode can be different. There is not a single method. Some use JSON to describe a menu and its items; others use strings. A clean way to handle this is to add a field to the navigation table with a running number. Also add a global text field to the navigation table with many repetitions. You can now load each record of the navigation into the repetition with the number from the extra number field. Do not change that number in your navigation table ever, and it can be consistently referenced.
Loading your navigation can now be handled through a script, which loops through the records of your navigation table and writes the information into the global repetition field. This is quick and easy.
Once you have the navigation table loaded into a global field or variable, you can reference it from anywhere in your solution. When using a global repetition field, you can reference the 432nd repetition by
“TableName::FieldName[432]”.
As a merge variable to put on your layout, you can write that as
<<TableName::FieldName[432]>>.
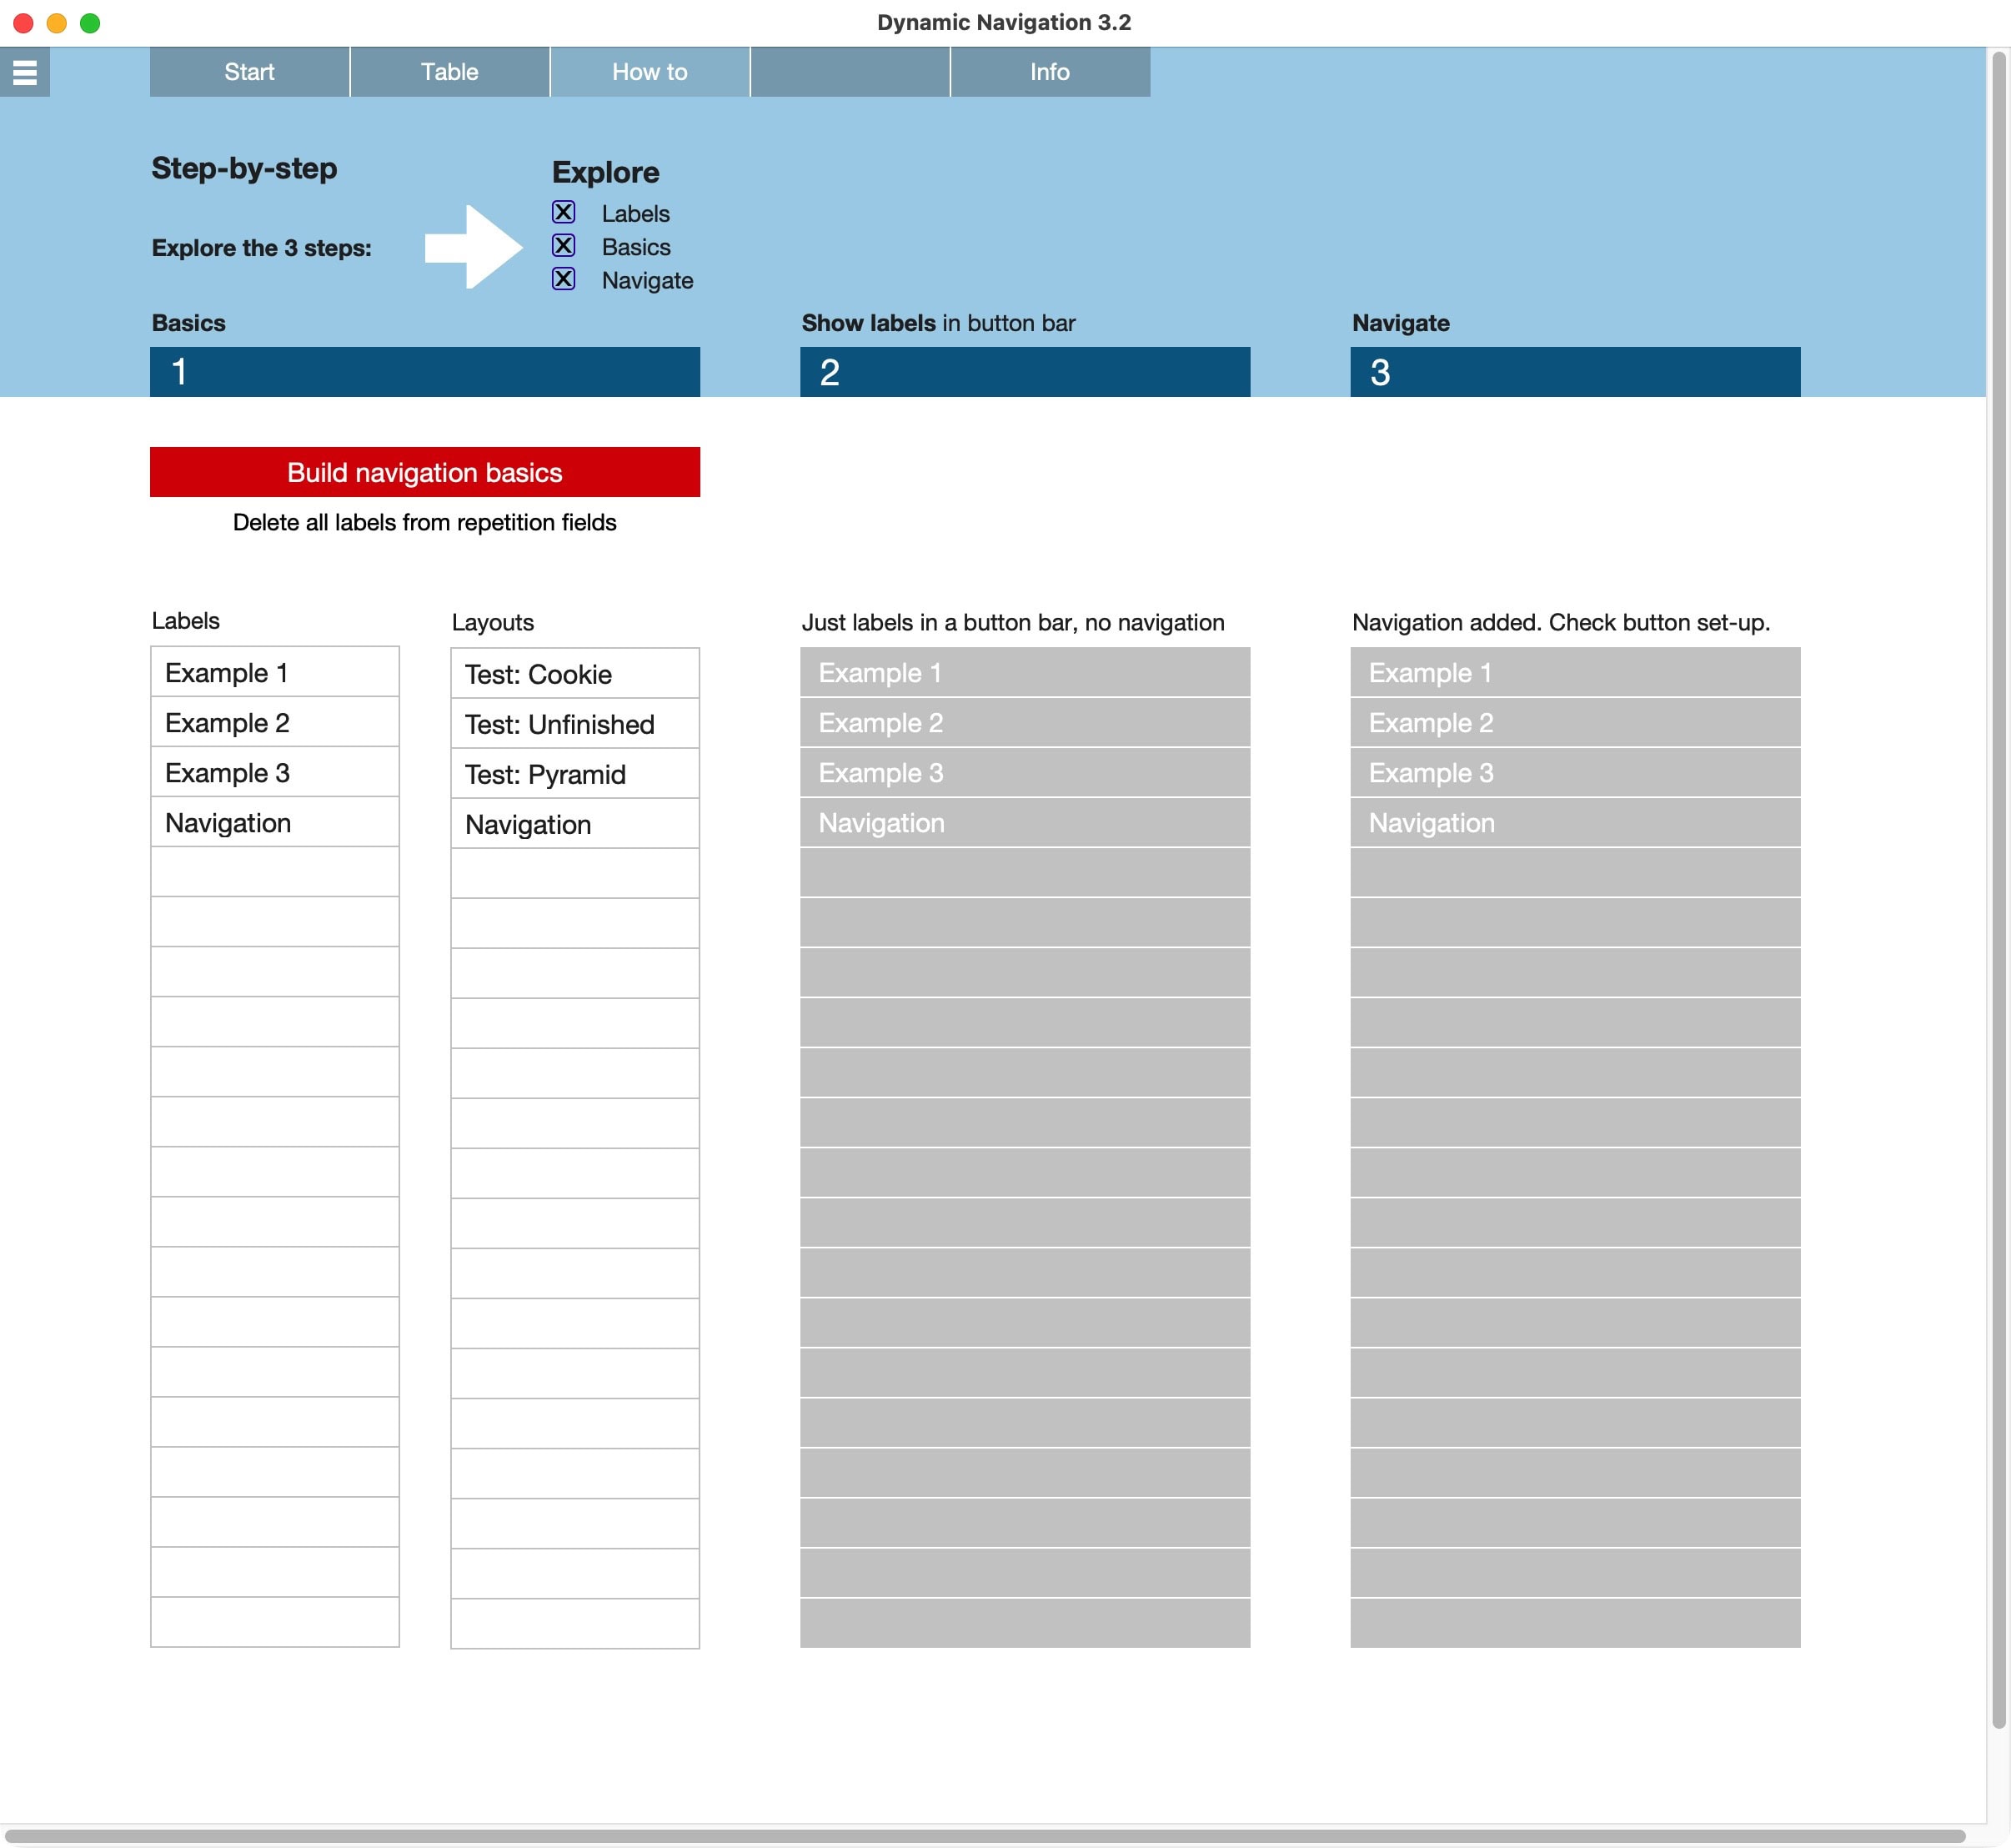
Click on the following button to get to an example of that navigation:
Starter files
If you look for a simple way to start your next FileMaker project, take a look at our starter files. They already have a dynamic navigation included. While this article focuses on the basic concepts behind such a solution, our commercial starter files have many more tricks up their sleeves. The good thing: You can simply start using these solutions and cut many months from your developing time.

FM Starter is a basic starter file, filled to the brim with generic tools and functions, like a navigation, multilingual text labels and more.
FrankCRM is similar to FM Starter but is strongly enhanced towards a business software. The focus is still on basic functionality, and you enhance the basics to create your solution. Included are new modules with a wide variety of settings: Addresses, Products, Sales documents. Check our free limited version.

Anchor-Buoy relationship model for FileMaker
Databases organize information (fields) in structures (tables and files). A flat-file database only has a single table in a single file. FileMaker became a relational database many years ago, allowing for multiple tables within the same file and allowing them to play together. You can now connect tables. This avoids redundancy and enables many options, both functionally and visually. There are a few ways you can connect tables (create relationships). This article is about these relationships and favors a specific model of relationships, called the “Anchor-Buoy” model.
What are relationships?
Relationships in a database environment like FileMaker are connections between tables. These connections allow you to link information to some other information. The type of linking will define it as a one-to-one (1:1) relationship, a one-to-many (1:n) relationship, or a many-to-many (n:n) relationship. This can create specific and unique links, category links, or cross-linking of many records.
Relationships are useful, for example, to enable quick finds of related records from other tables, to read or write data to other tables, and such things; they reduce redundancy of information and by that, help to maintain the integrity of the data.
Examples of relationships:
- One invoice has multiple line items with sold products. The invoice is in one table; the items are in a linked different table.
- One address or company can have multiple employees or persons attached to it.
- In a workflow, certain stages of production can be linked to multiple other stages.
- In a library setting, a book can have added information in other tables, like the author, the publishing house, the series it was published in, and many more things. These other pieces of information are best kept in separate tables but can be linked to each other.
Note: The relationship model you choose is essential for the success, maintainability and longevity of your solution.
Best practice
FileMaker is quite forgiving when applying different methods of creating relationships. The only fixed requirement is that you link tables by linking two fields. This is done in the database window (File > Manage > Database), in the tab “Relationships”. There you find a visual representation of all tables. Each table has at least a single occurrence but frequently gets several occurrences for different purposes.
Within that view, you can click on a field of any table occurrence and drag it to another field of another occurrence. That way you create a relationship between those fields and, by definition, between two tables. Each relationship has a purpose. You define that purpose by not only defining the link (visualized by a line between the different tables and fields) but also by defining some settings (visualized by a block in the middle of that line, which you can double-click to open the settings).
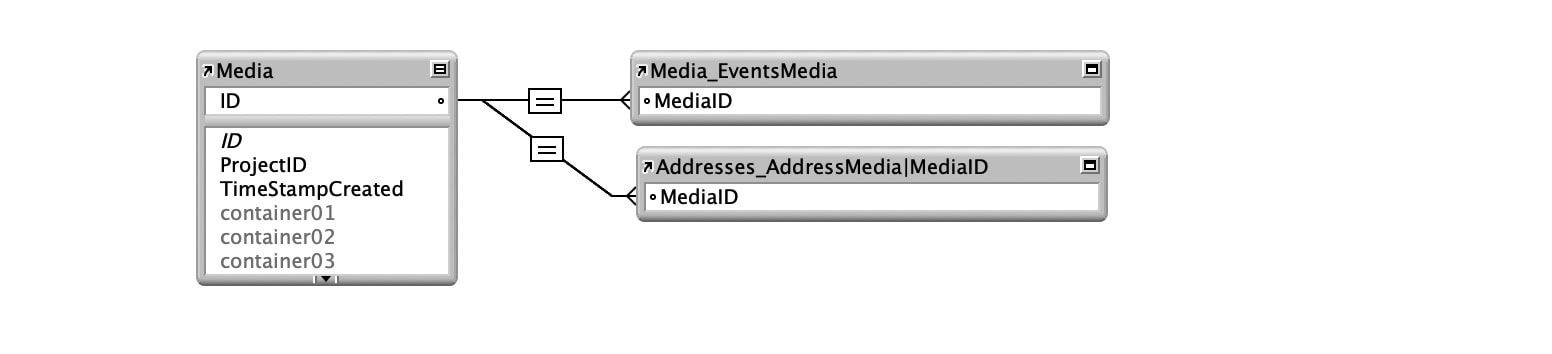
Beyond these basics, you can create relationships as you like. FileMaker does not confine you to a certain method. Yet, it is helpful to give this a thought, as each decision you make will have consequences down the road. Every developer has to deal with both the decisions and the consequences. As it turned out, not every approach is simple or sustainable over the long run. People came up with preferred methods of creating relationships. While several methods worked at first, not every method was bulletproof, so to speak, once the application grew.
The best practice thus has nothing to do with the linking itself but with the structure you use around this linking. You create the environment within which you will develop your application. You are the builder of an ecosystem. Best practice recommendations help you to thrive when you build your personal ecosystem in your next app.
Consider each relationship model in FileMaker as an ecosystem. Here are several versions frequently observed out in the wild.
3 basic relationship models
Over time, several approaches were tested, and today, the following three are recognized among many FileMaker solutions:
- Spaghetti-style
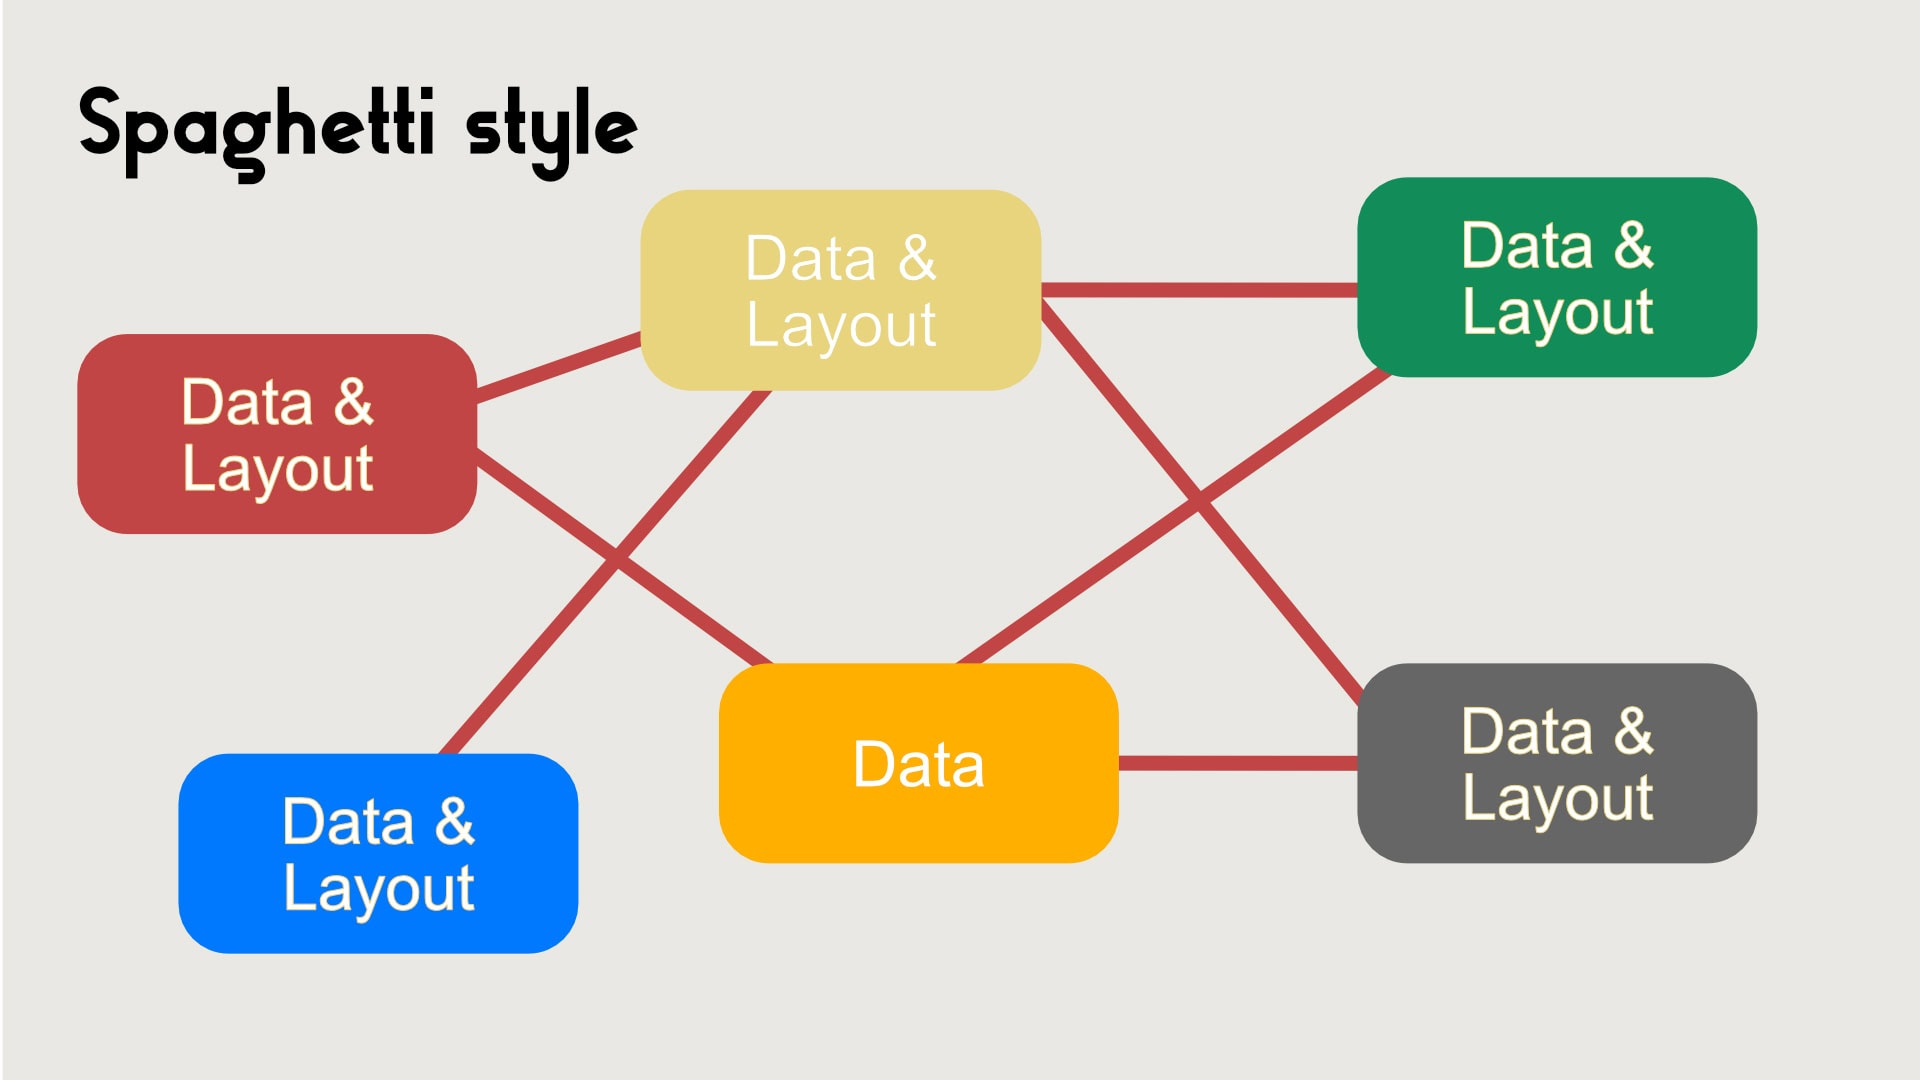
No strategy. Everything is connected with everything. Layouts are everywhere. Scripts start at possibly any location and can cause unpredictable results because of that. Most developers start out by just trying to work with FileMaker, create relationships as they go, and end up with a spaghetti-style mess in which everything is entangled. Applications that grow this way organically become increasingly difficult to maintain and develop. - Anchor-Buoy
Clear strategy, in which starting points and options are well defined. One always knows where layouts should be and what relationships are available from that point. This is the model and topic of this post. Most professional developers, to my best knowledge, use this method today. It is best practice. - Selector-Connector
System of relationships and an advanced application of the Anchor-Buoy model. All relationships exist in a system with global application for the file. It fulfills the desire to be able to go anywhere and do anything when relying on the system. It also locks you in a system. The system requires more knowledge and careful application for each step than the simpler Anchor-Buoy model. That also might be its weakest point. Most developers I know, who tried the Selector-Connector model, moved back to the Anchor-Buoy model for several reasons. Among these reasons are complexity, performance issues, and system dependency.
The Anchor-Buoy model solves the unpredictable and messy situation of the spaghetti-style model while avoiding the complexity of the Selector-Connector model. It is in a sweet spot, which is easy to understand and use.
While FileMaker, as an application, does not care about what model you use, developers choose to go for a certain model because of certain benefits. You cannot go wrong with the Anchor-Buoy model, as it is simple, transparent, and understood by many other developers. It is a good starting point because of all these reasons.
Here are some benefits of the Anchor-Buoy model listed:
- Easy set-up
- No system, just an understanding
- Visually clear
- Maintenance and development are easy
- Scripting is simplified by this approach.
There are also some downsides:
- The structure of this model must be understood
- You end up with many more table occurrences.
Now let’s have a closer look.
Spaghetti-style
This is the most common type of styling for anyone starting off with FileMaker. Embrace the options FileMaker gives you and just keep on walking. There is nothing inherently wrong with this approach, but there are downsides. These downsides usually make a solution unpredictable, difficult to maintain, and eventually challenging to develop. While it all starts simple and quick, it can quickly derail into something that is not easily understood and takes increasingly more time the further you go.
This is the type of application some clients and companies develop for themselves until they see no way out. At that point they call a professional developer, who has the almost impossible task of disentangling the mess. The first thing a seasoned developer will do is look at the relationship model and start speaking with the client about the things to solve.
What a professional developer immediately sees is the type of relationship model, which is the cause of much of the trouble the client spoke about. Solving the issues at hand would basically require a remake of the application by choosing a better relationship model. That, however, would mess up scripts, layouts, and all the workflows, based on the spaghetti-style approach. The real question then is this: Do you want to invest in an entirely new development or try to improve only specific issues? It is a question of budget and time.
Often, a new development is not wanted because of the investments in time and money and probably some pride for the original application. The developer can try to improve the situation by rearranging the table occurrences in the relationship graph to make it more transparent and strengthen the relationships where possible. However, that doesn’t change the underlying approach. New developments within the same application will most likely be set up by using a different kind of relationship model, independent from the original structure.
The spaghetti-style method is logical if you just started exploring FileMaker. It occurs naturally, but over time becomes increasingly difficult to work with.
Anchor-Buoy
The Anchor-Buoy model of relationships is the most used variant among developers. This is for good reasons: It is easy to understand, reliable, future-proof, and proven in countless professional applications.
This is not about a religious appreciation of a certain way of doing, but about practicality. There is no must here, but it will enable you to create reliable solutions that are simple to maintain and can easily be enhanced. The approach tries to make it simpler to strengthen it. It is something similar to that slogan: “Simplify your life”.
The Anchor-Buoy principle does so by defining table occurrences in the relationship graph to fit specific purposes. Each table occurrence is either an anchor or a buoy. According to their function, they can or cannot do things. That is not a technical limitation by FileMaker but a decision by the developer to simplify development. It is a way of approaching the inner structure of the file.
How does it work?
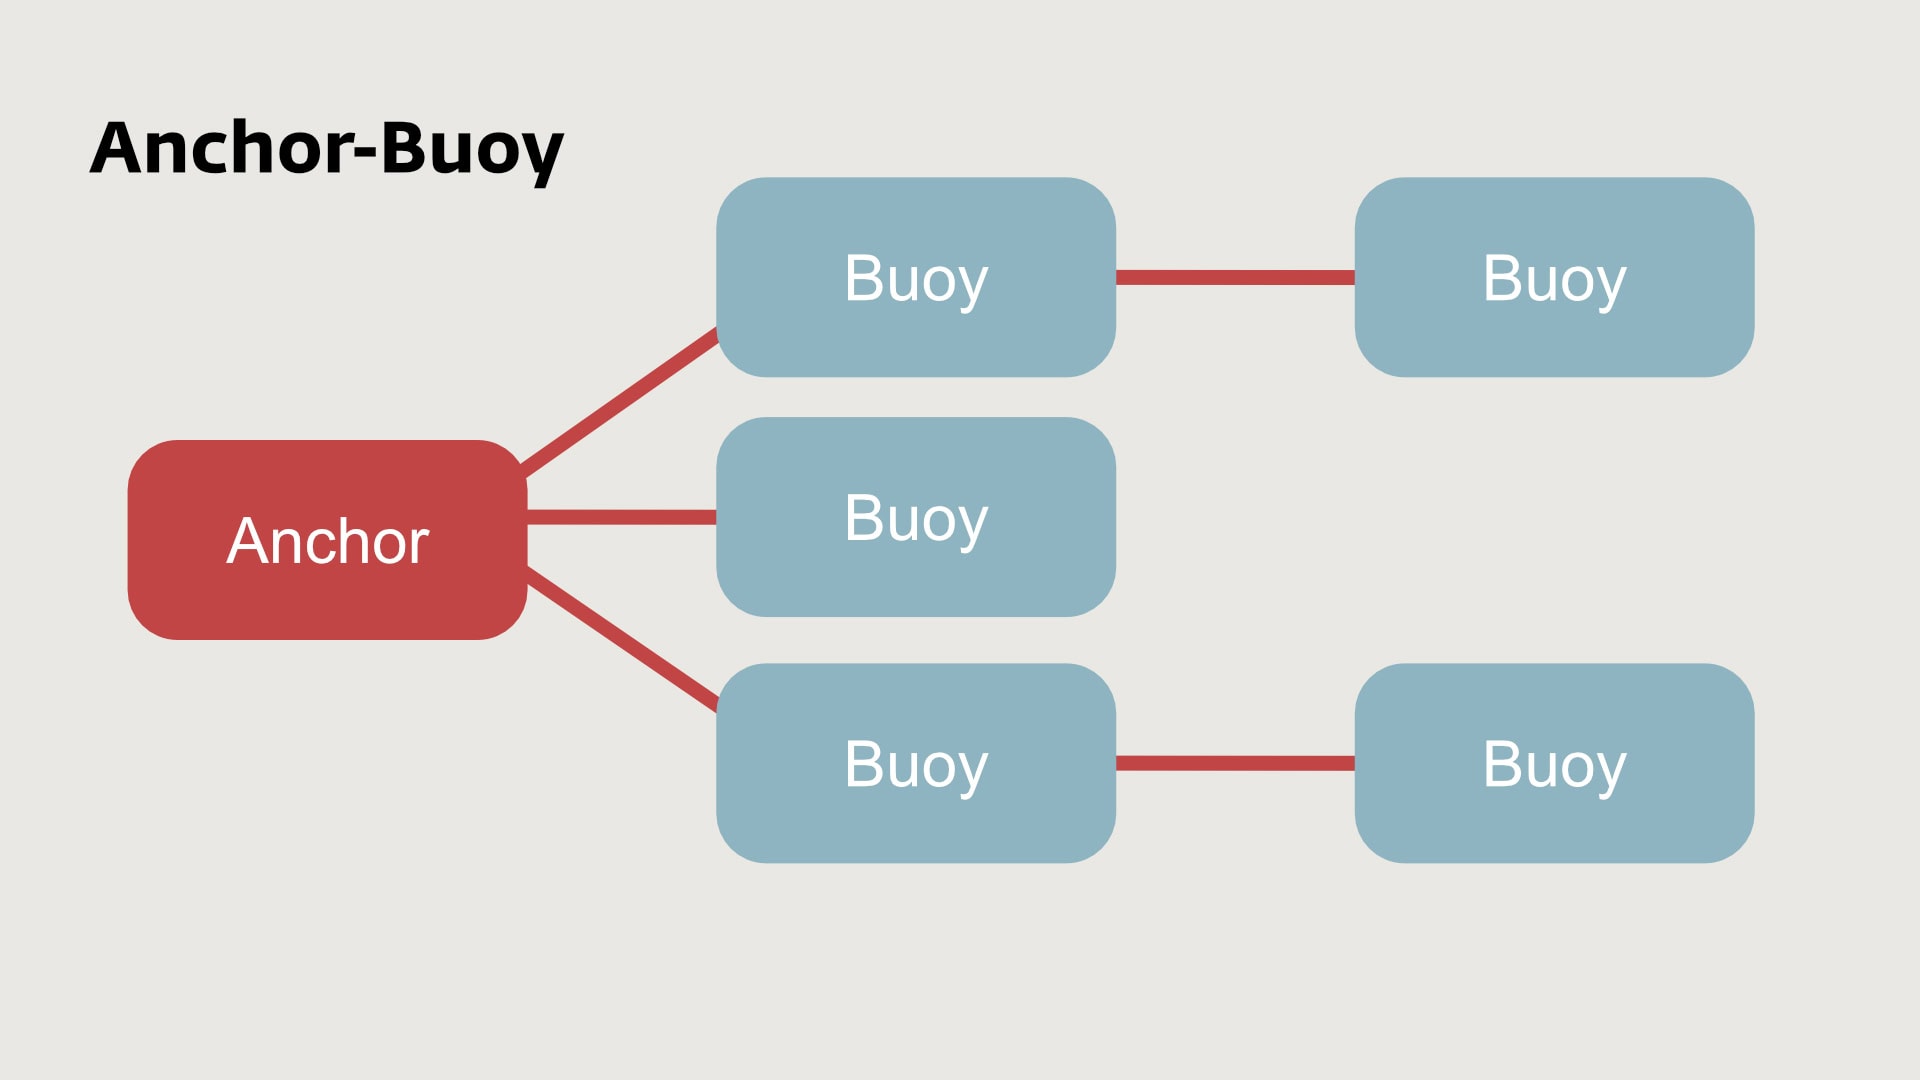
In an Anchor-Buoy model, you look at table occurrences from a developer perspective. Each so-called “anchor” can have multiple “buoys” attached. Anchors never are linked. It is always a single anchor and one or more buoys. One such group is something like an island. Mostly, there are multiple of these islands in a single application, where each island has an own set of anchors.
Here are some specifics:
- Anchor, the central element
Layouts are only created on anchors, never on buoys. For that reason, users always will be on an anchor occurrence, and scripts will start on an anchor occurrence as well (by clicking on a button or a layout trigger on that layout). Anchors are usually the starting points for processing. - Buoy, the related tables
Buoys are never used for any layout. Instead, they are used to read or write data, or for something like “Go to related record”. Buoys help your anchor layout and scripts to find, process, or route any information from that starting point.
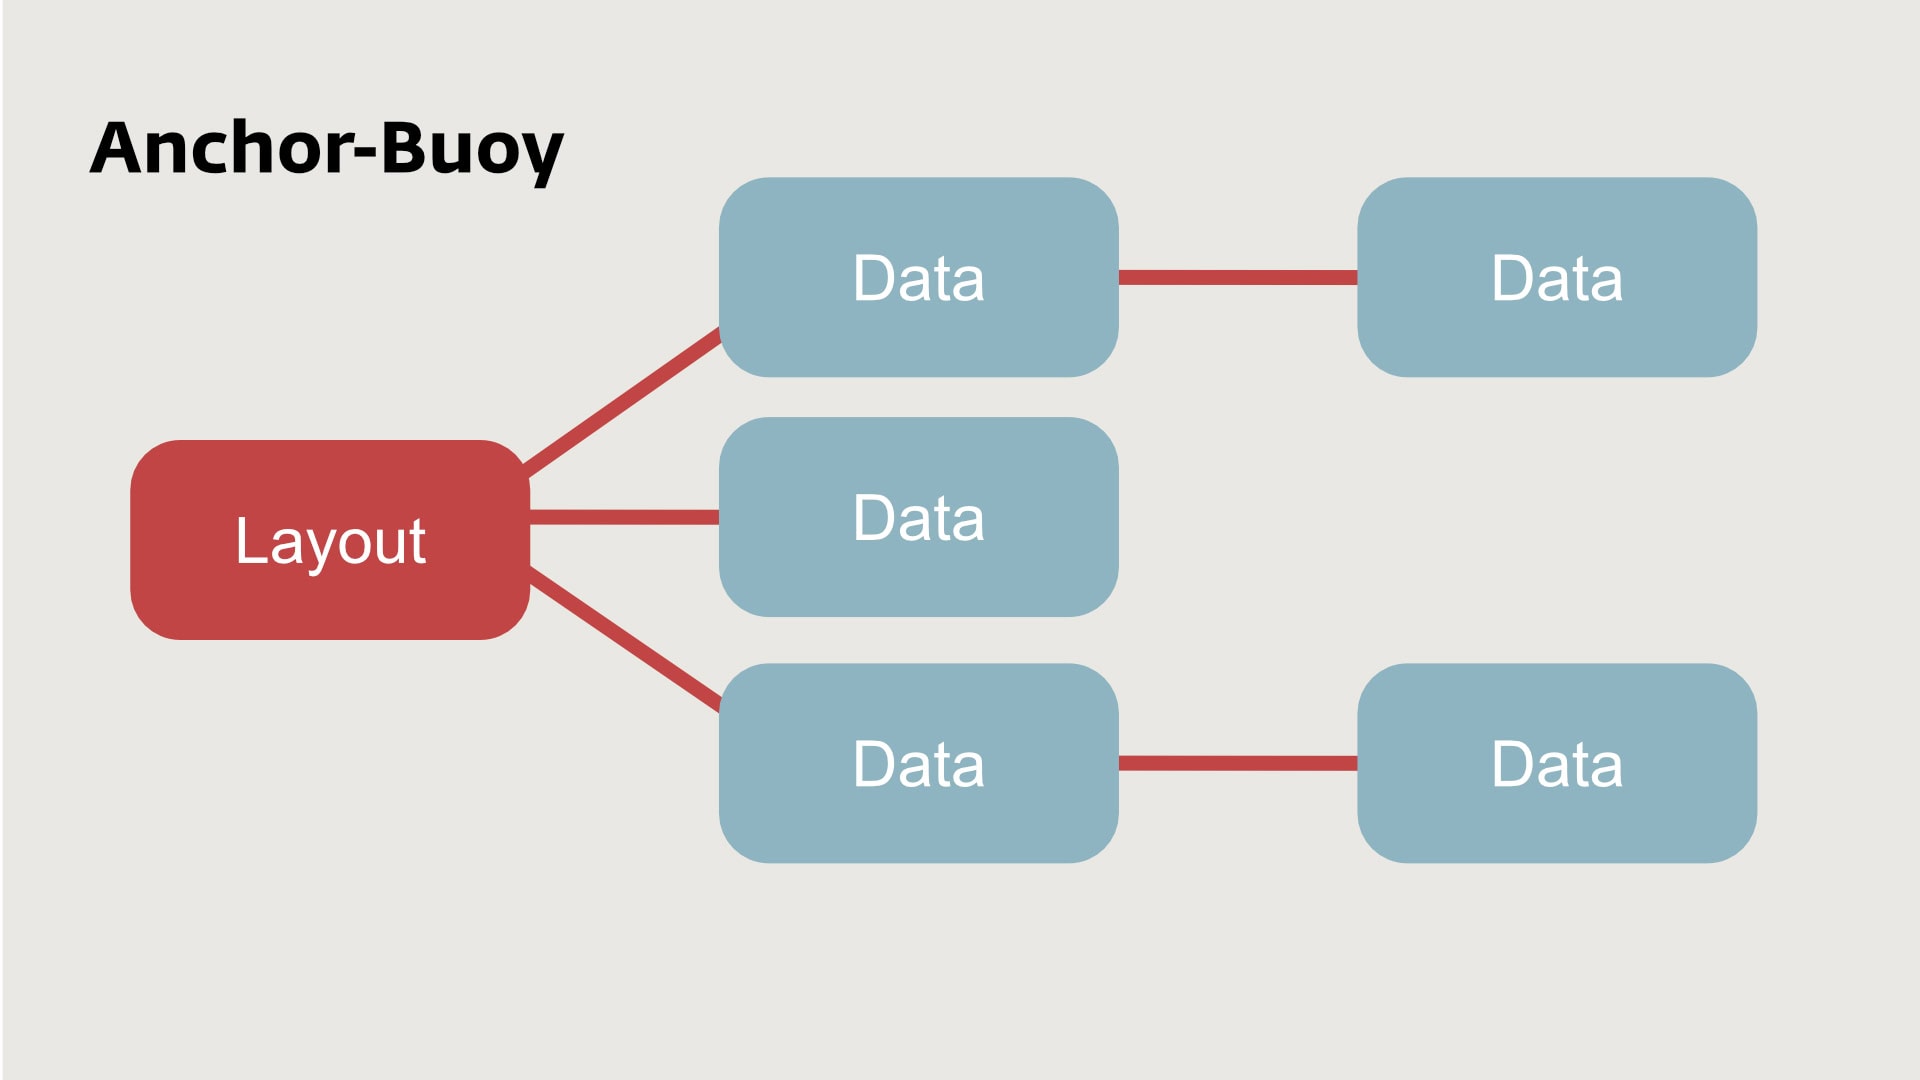
In FileMaker, data and design are intrinsically linked. Each layout is based on and linked to a certain table. Therefore, it is logical to link layouts to table occurrences. It will always be the case. However, it does matter where you put your layouts. In a spaghetti-style setup, you don’t care about the whereabouts of any layout. In the Anchor-Buoy model, though, it matters.
As shown in the image above, different table occurrences are shown. On the left is the anchor defined. There you also find the layout(s). On the right side of that single anchor, you find the buoys. These are used to retrieve or write data.
It is good practice to visually represent the anchors and buoys the same throughout your relationship graph. It is helpful, for example, to always put your anchors on one side and the buoys opposite of that. Like: anchors at the left side, buoys on the right side. Also acknowledge that layouts cannot be built on just any table occurrence, but only on anchors. This simplifies a lot. It tells you where your anchor is and thus where your layouts need to be.
Let’s explore that in a bit more depth.
Example
Assume you are working with a table called “Addresses” and you have other tables linked, like “Contacts” and “CommunicationData”. Now let’s assume we consider where to put the layout for “Addresses”. Logically, that would be on a table occurrence of “Addresses”. Many developers work with the idea that every first occurrence of any table is, per definition, an anchor. It is the table in its most pristine view and with the most basic naming (just the name of the table). There are no relationships yet, and everything is in the green, so to speak.
Starting with this table, you want to create relationships with both “Contacts” and “CommunicationData”. However, you will not use the first table occurrence of these tables as buoys. Why? These first table occurrences also could become Anchors. Thus, you put all first table occurrences at the left side of the relationship graph and than start adding new table occurrences.
How does that work?
Well, you add a new table occurrence with + in the relationship graph. You then select a table, like “Contacts” and it will add a new table occurrence for Contacts. As there already is a first table occurrence for that table, FileMaker will name that second occurrence something like “Contacts 2”. That’s fine. You can change that name.
A good way to name that second occurrence is linked to its usage. As you want to create a relationship from the Addresses table to the Contacts table, you could name it something like: “Addresses_Contacts”. It has the source table, an underscore, and then the target table. As a personal preference, I add a pipe “|” followed by the relationship field or criterion. A full name for the new Contacts table occurrence could be: “Addresses_Contacts|AddressID”. This is helpful in many ways. By the name, I can get an understanding of the usage. It also lists these names perfectly in alphanumeric sortings.
In our example, you now have 2 occurrences for the table “Contacts”:
- Contacts (to be used for an anchor occurence)
- Addresses_Contacts|AddressID (used as a buoy from the anchor Addresses, using the criterion “AddressID”).
There is no rule about how you should do it. This is just how I use it. Please don’t hesitate to do it differently. Some developers prefer to write their anchor occurrences in CAPITALS. Just be consistent in it. Consistency is a great way to preserve transparency over time.
Island hopping
In an Anchor-Buoy model, you build some kind of islands in your relationship graph. Each island consists of a single anchor, linked to as many buoys as needed. These islands have big benefits compared to a spaghetti-style approach, where everything is somehow linked to everything else. In an Anchor-Buoy model, that is no longer the case. Everything is split up into logical groups, the islands.
Within an island, everything is consistent. It is perfectly clear on which table occurrence layouts are built. Those are also the starting points for scripts. What you can do with data from other tables is defined by the specific buoys of that island. But how can you move from, let’s say, the Addresses island to the Contacts island or Projects island?
That is easy. You can simply jump to any layout of another island, which will be on an anchor occurrence. That is easy. You also can use the function “Go to related Record”. From the Addresses layout, you use one of the buoys to get to a specific set of data. Think of jumping to the contacts of a single company by using the previously defined relationship:
- Addresses_Contacts|AddressID.
In the setting of that script step (“Go to Related Record”) you then choose an anchor layout from the Contacts table, like the previously mentioned:
- Contacts.
Doing it like this lets you easily move around within an Anchor-Buoy setup of your file.
Selector-Connector
The Selector-Connector model is quite interesting and based on the Anchor-Buoy model. Yet, it is enhanced to a system and rule system that makes it a different approach. The Selector-Connector model is not further discussed here in the post. As it is an interesting enhancement, please check out other posts you can find on the internet. Variations might use different words like “Transistor model”.
This concept is interesting for some scenarios, as it builds on a single universal context, through which all functions and data flow. That simplifies or structures requests beyond the options of a mere Anchor-Buoy approach. This can be a demand for a project. Also consider that this unifying approach can be more easily enhanced toward a session model, which is useful for some projects.
Is there a best relationship model?
That question should be answered by now, as I mentioned that most developers I know work with the Anchor-Buoy model. That does not necessarily make it “the best”. It is not the most technically savvy solution, as that is the Selector-Connector model or variations on that. The reason that people moved away from the Selector-Connector model is mostly that it was unnecessarily complex for most work. To create a system, then do everything from that system, needs a lot of overhead.
While the Anchor-Buoy model probably has the highest number of relationships (every island needs its own set of ferries), it has the highest practicality. Simplicity beats advanced setups. It is simple, robust, and solves the issues of the spaghetti-western story. From a pragmatic point of view, the Anchor-Buoy model most likely wins the race.
In any scenario, the spaghetti-style model has the fewest lovers and the most issues. It might work for some if they are extremely cautious and work along their own rules. Consistency and understanding are key to any success and not just a given for that model. Anyone starting out with FileMaker should probably be aware of the dangers of too much flexibility.
Do you think these conceptual thoughts are helpful?
Did you like this insight? Share it with someone who might benefit from it.

Reviews and Newsletter added
A few weeks ago, we announced a complete revamp of this website. Additional features have now been added.
A website for FileMaker developers
For developers and for those, who want to become one. Our website is the vehicle for our mission. fmstarter.com lists itself as «Resources for FileMaker developers. For entrepreneurs, who build what others buy». A clean website with useful functions for those looking for easy-to-understand FileMaker solutions. After the initial relaunch a few weeks ago, we now started to expand the functionality. That second phase of development is what this post is about.
A word about our goal: We want to share our experience, as we have profited from others tremendously. However, we don’t aim to provide the most technically advanced solutions. Many already do that successfully. Our focus is more on the Low-Code-aspect of FileMaker, making it possible for solopreneurs to get their next FileMaker project off the ground. We are here to help you help yourself, with proven functionality and concepts that are easy to understand and implement.
This means that solutions provided have been thoroughly tested, frequently simplified over time, to make the tools reliable for as many types of developers as possible. Have a look around on this website to see what we mean by that.
Now to the new options we implemented:
Ratings and reviews
We want to you to make good choices about our products. Feedback and insight from actual buyers will help fellow developers to make informed decisions about our products and services. That is why all products in our shop now have a review option. Review and rating is open to all buyers. You must be logged in to provide your feedback.
Do you already own a product? Now is the time to provide valuable feedback. Thank you for your effort!
FM Starter Newsletter
We have reactivated our newsletter. While there was a newsletter option in our latest website, it was hardly used. This now will change. The newsletter provides an automated monthly summary of new posts. This will include posts about new sample files, add-ons and generic texts about FileMaker and developing, as well as support texts for our products.
By providing a newsletter, we can offer more information for those interested. As you might have noticed, we only send short emails, which are focussed on the products you purchased or items you downloaded. Those might be rare occasions. The newsletter option is different, as it has more benefits: We can now write more regularly also about generic topics and make it useful to more people, while those who like that information can subscribe if they like what they read.
On the newsletter page, we also explain how we structure our communication.